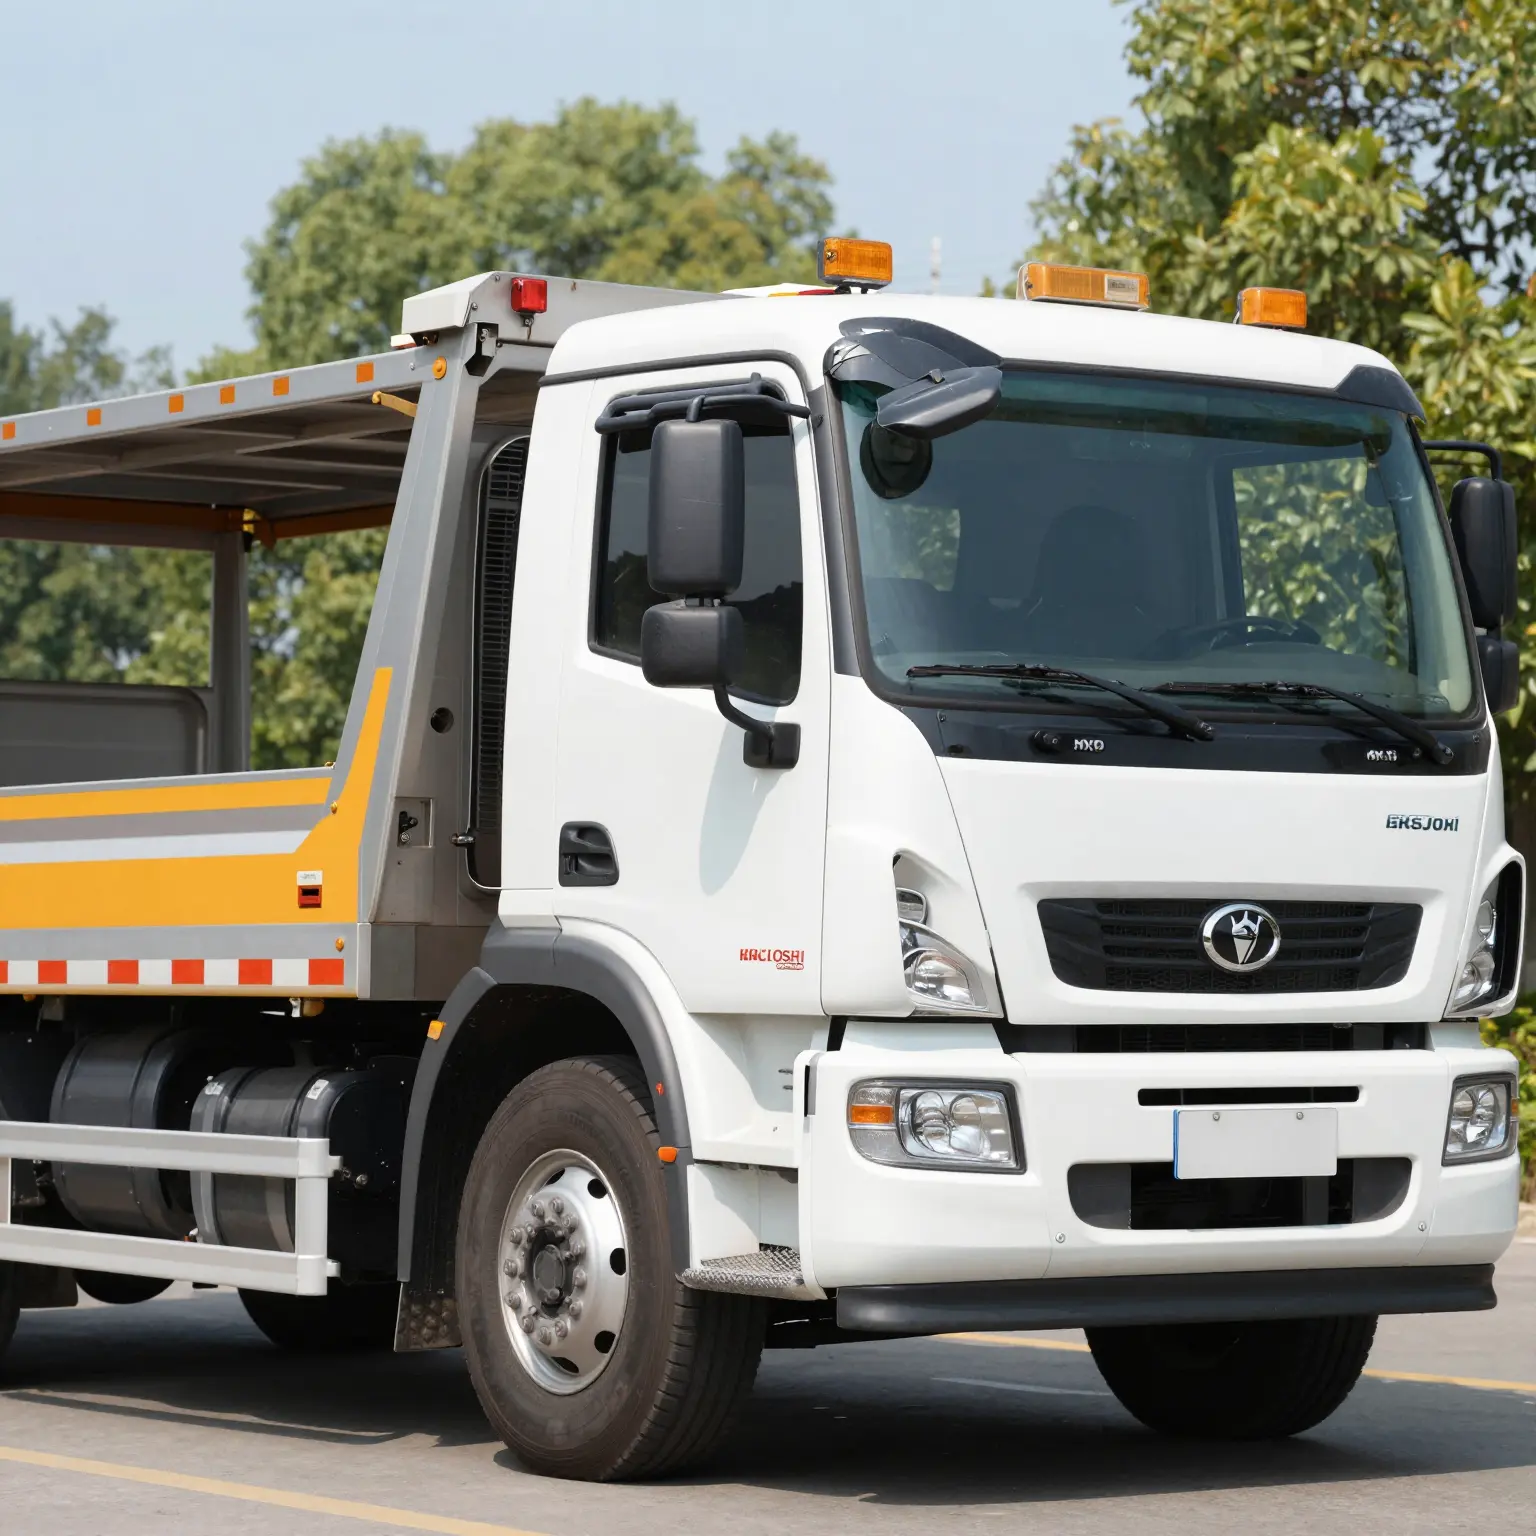

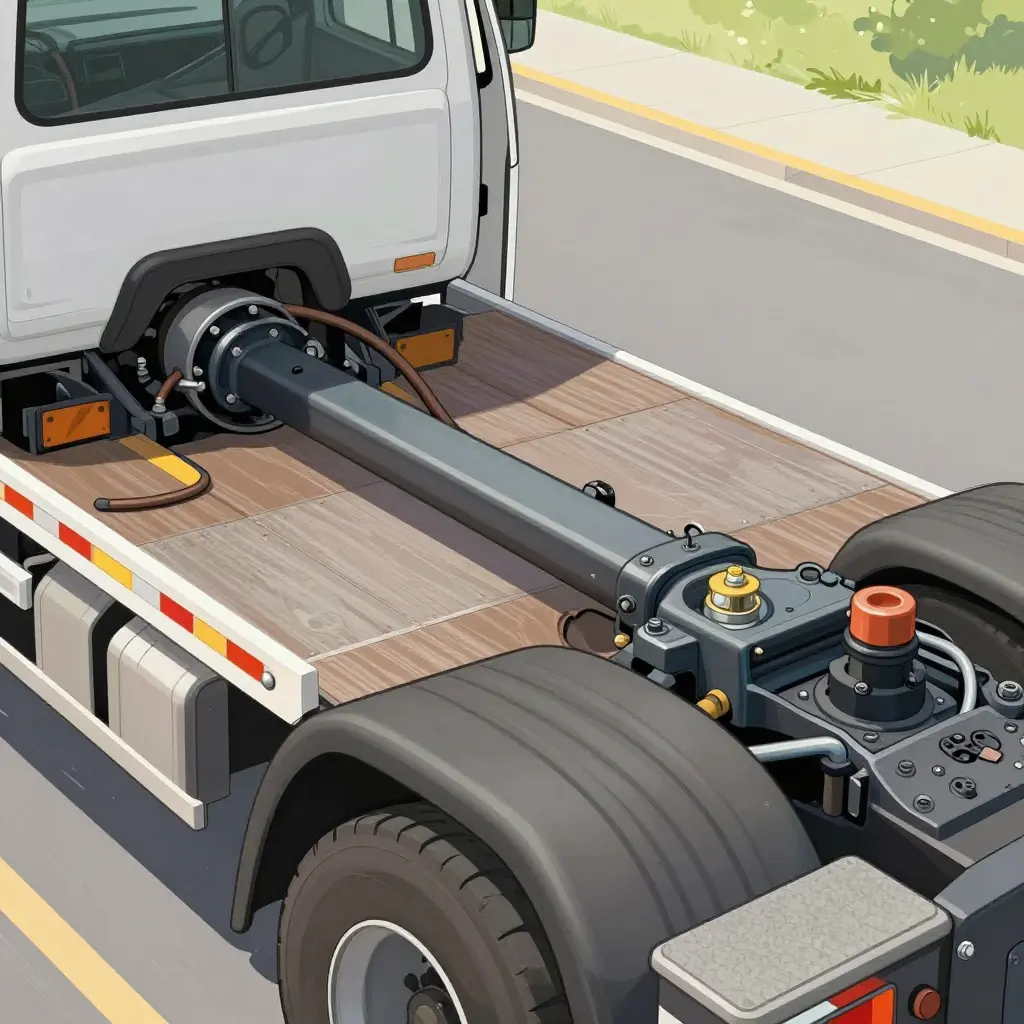
Why Driveline Removal Comes Before a 60 Mile Tow
On a hooked tractor, the driveline stops being a power path and becomes a parasitic one. Driveline removal means breaking the mechanical connection between the road wheels and the transmission before the semi tow truck lifts and pulls. Skip it and a 60 mile tow turns into a 60 mile grind. Two methods qualify, and they are not interchangeable:
- Driveshaft removal – the interaxle or main driveshaft is unbolted at the flanges, pulled clear of the yokes, and secured to the frame or lifted with the carrier, so the gearbox and the wheels are mechanically isolated from each other.
- Rear axle shaft removal – the shafts are withdrawn at the wheel hubs so the wheels freewheel while the differential carrier stays bolted in the housing. Pull both shafts on every drive axle. This is the fallback when driveshaft access is blocked by close-coupled air-ride plumbing, a drop-frame, or a damaged flange.
Neither method is the same as leaving the transmission in neutral, and neither is optional when towing a semi truck beyond the length of a yard move.
The Mechanical Premise
With the driveline connected, the transmission output shaft, mainshaft, countershaft gearing and differential assembly keep rotating while the engine’s lubrication circuit supplies nothing. On a Roadranger-style manual there is no lube pump at all: oil reaches the gears only because the countershafts churn the sump, and the countershafts turn only when the input shaft does. On an automatic or an automated gearbox with an engine-driven pump, the pump stops with the engine and line pressure goes to zero. Either way, no engine rotation means no pump flow, no throw from the countershafts, and no cooler circulation. The differential is a separate case: the ring gear keeps dipping and slinging, but the pinion and interaxle assembly get less directed splash than the design assumes.
Metal-to-metal contact stops being the exception and becomes part of normal operation.
| Aspect | Driveshaft Removal | Rear Axle Shaft Removal |
|---|---|---|
| What stops rotating | Driveshaft, transmission output shaft and gearbox internals | Ring gear, pinion, spider gears and the rest of the carrier |
| What still spins | Wheels, axle shafts, ring gear and the pinion it drives | Wheel hubs and wheel bearings only |
| Typical use case | Standard flat-tow or wheel-lift prep on an accessible chassis | Blocked shaft access, seized flange hardware, damaged gearset |
| Failure risk | Gearbox gear train runs dry if the shaft stays in | Wheel ends lose positive lube; park brake inoperative |
What This Article Covers
The scope is procedural and mechanical: driveline removal that can be done roadside with hand tools and a torque wrench, the lubrication failure that makes it necessary, and the wear it prevents – spalling, scuffing, heat-hardened seals, bearing brinelling. Distance matters because the damage is cumulative. The first five miles may only polish a bearing surface; by mile forty a mainshaft running dry has begun to score. Dispatchers and fleet managers who already price a properly equipped semi tow truck into recovery work will recognize the same arithmetic applied to the towed unit.
What Spins Without Oil: Transmission and Differential Internals During a Tow
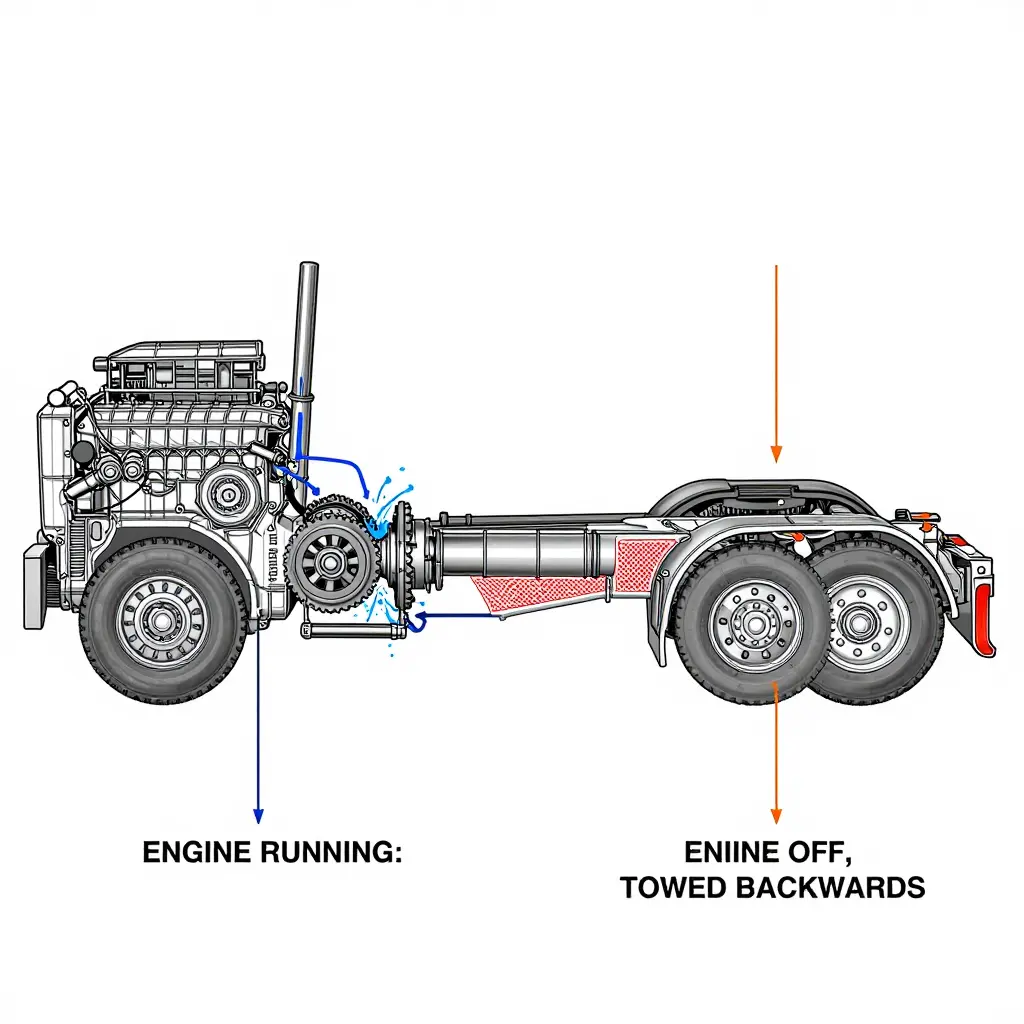
A tractor rolling behind a hook still transmits torque. The engine is off, but the rear wheels, the ring gear, the pinion and every shaft between the differential and the clutch are being back-driven at highway speed. Which parts turn, which stay still, and what feeds them oil is the whole reason the driveline comes out before a long tow.
Transmission lubrication with the engine running
A Roadranger-style manual transmission is a splash-lubricated, constant-mesh, twin-countershaft gearbox. There is no oil pump and no pressure gallery. The input shaft turns at engine speed and its gear drives both countershafts, which sit low in the case, partly submerged in the sump. Those countershaft gears churn the oil upward onto the mainshaft, the gear bores, the shift forks, the clutch collars and the tapered roller bearings at each end of the case. Troughs and drilled channels catch what the countershafts throw and meter it into the bearing cones and into the pilot bore at the front of the input shaft, where the nose of the mainshaft rides. Return flow is gravity alone.
When the wheels become the input
Engine off, driveline connected: the power flow reverses. The wheels drive the axle, the axle drives the shaft, and the shaft drives the transmission output and mainshaft backwards. The mainshaft then turns at road speed for the entire tow, and everything mounted on it turns with it.
In neutral with the clutch engaged, the engine holds the input shaft still, so the countershafts stand still too. The mainshaft gears float on the shaft or on sleeves and needle bearings, so they do not rotate with it; the shaft spins inside them. That is continuous relative motion at the gear bores and at the mainshaft nose pilot, fed by nothing but residual oil clinging to the surfaces. Engage a gear and the countershafts are back-driven in reverse, the input gear turns the input shaft, and the input shaft either drags the engine over or spins free if the clutch is released. Either way the countershafts are now churning cold 75W-90 or 80W-140 at low speed, in a direction the troughs and channels were never shaped to catch.
| Component | Engine running, driving | Engine off, wheels driving |
|---|---|---|
| Input shaft | Driven at engine speed | Stationary in neutral with clutch engaged; spins backwards with a gear engaged |
| Countershaft | Driven by input gear, churns sump oil | Stationary in neutral; spins backwards with a gear engaged |
| Mainshaft / output shaft | Driven by clutch collar, carries load forward | Back-driven by driveline, turns for the whole tow |
| Main gear bores | Splash fed from above | Shaft rotates inside stationary gears, residual oil only |
| Tapered roller bearings | Splash and trough fed | Boundary lubrication, heat, then spalling |
| Pinion bearings | Ring gear throws oil into pinion housing | Throw-off pattern reversed, pinion nose starved |
Tapered roller bearings under boundary lubrication
Tapered rollers need a film between roller and race and flow through the cone to carry heat away. A towed gearbox and axle turn slowly compared with engine-driven speeds, so churning is weak and throw-off reaches only the surfaces near the oil level. Cold 75W-90 or 80W-140 does not climb or splash well. The rollers skid instead of rolling on a film, contact drops into boundary lubrication, and the steel starts to micro-weld and tear.
Differential lubrication and the hypoid offset
A hypoid differential has no pump either. It relies on the ring gear dipping into the sump, carrying oil up on its teeth and face, and throwing it into the pinion housing, across the carrier bearings and onto the spider gears. Hypoid offset puts the pinion below the ring gear centerline, so the teeth slide as well as roll and the pinion bearings run under preload; they need that directed splash to survive. Reverse the torque path during a tow and the ring gear turns the other way. The oil it throws now lands away from the pinion nose, the pinion bearings and the seal area get little or nothing, and the tooth flanks load on the coast side of the pattern instead of the drive side. Rotation direction is what starves the pinion, not driveline angle.
Pinion bearings, ring gear splash and the seal lip
The pinion seal lives on oil slung against its lip. A dry lip burnishes against the yoke journal, hardens from friction heat, loses spring tension and starts to weep. Once the pinion bearings heat and lose preload, the pinion walks in the housing, the seal runs off center, and the leak speeds up the starvation.
The cause-and-effect chain
No pump and no effective splash feed puts the mainshaft bores, the countershaft bearings and the pinion bearings into boundary lubrication. Friction heat follows, thinning what film is left, expanding the bearing stack and changing preload. Then adhesive wear scores the gear flanks and races, the case-hardened surface fatigues and spalls, the seal lip hardens and fails, and the box or the axle eventually seizes. Pull the shaft and the chain never starts, because the mainshaft and the output stop turning. The pinion keeps turning, but it turns in a splash-fed housing the way it was designed to.
What Still Turns After the Shaft Comes Out
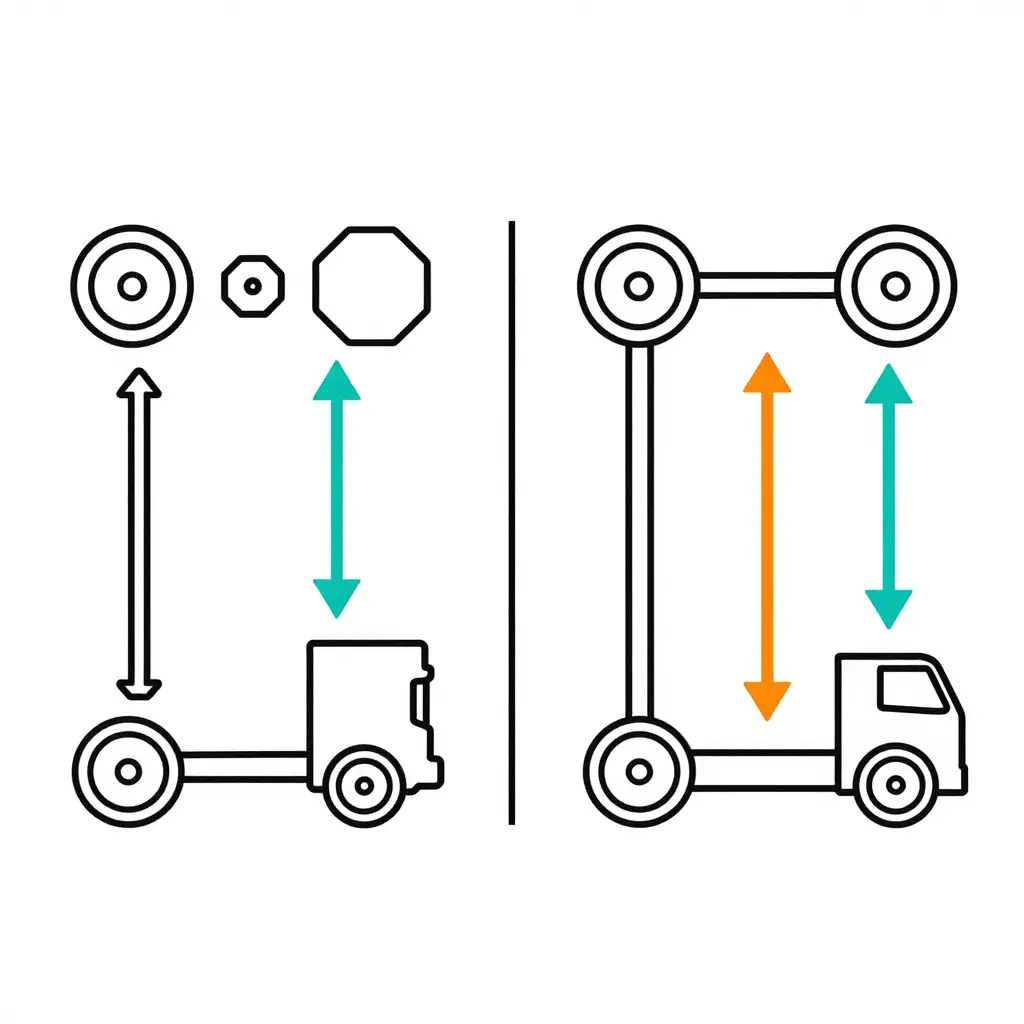
The two panels above are the argument in one glance. Pull the driveline and the mechanical chain breaks at the driveshaft. Everything behind that gap keeps turning for all 60 miles, because the rear tires are rolling on pavement with the engine off. Everything ahead of it sits still.
Aft of the gap: still turning, still oiled
Once the wheels roll, the axle shafts, ring gear, spider gears and pinion are all driven backward by the tires. That is mostly harmless, because the differential is a splash-lubricated housing: as long as the ring gear keeps dipping, it keeps slinging oil onto the carrier bearings and the power divider. The pinion now runs unloaded, driven by the ring gear rather than driving it, so the throw lands differently on the nose bearing and the seal gets less direct splash. Barring a worn seal or a housing that was overfilled or run low, that is acceptable for a 60 mile tow.
Ahead of the gap: no rotation, no wear
With the shaft out, the output shaft, mainshaft, tailshaft bushing and rear seal do not turn at all. A part that does not turn cannot run dry.
What happens if the driveline stays in
Leave the shaft bolted up and the tires backdrive the whole driveline with the engine off. The mainshaft and output bearing spin while the input shaft and countershafts stand still, and on a manual those are the parts that lift oil up to the mainshaft. The rear bushing and seal, the U-joint needle bearings and any center support bearing run with nothing feeding them. Sixty miles of that is enough to score a mainshaft, wipe a tailshaft bushing and burn a yoke. On an automatic, the rear lube circuit depends on the engine-driven pump, so the same tow ends in a rebuild.
| Component | Shaft installed, engine off, wheels rolling | Shaft removed | Lube source while rolling |
|---|---|---|---|
| Axle shafts and wheel ends | Spinning | Spinning | Gear oil splash |
| Ring gear and spider gears | Spinning | Spinning | Ring gear dipping in oil |
| Pinion and pinion bearings | Spinning | Spinning, driven by the ring gear | Splash from the ring gear, throw pattern reversed |
| Driveshaft, U-joints, center bearing | Spinning | Removed | Sealed grease, no oil circuit |
| Transmission output shaft and mainshaft | Spinning | Stationary | Needs input shaft and countershaft turning |
| Transmission tailshaft bushing and seal | Spinning | Stationary | Oil thrown forward by the gear train |
Practical confirmation before you roll
- Chock the front wheels and confirm the parking brakes are released before you spin anything by hand.
- Match-mark the yoke to the companion flange so the shaft goes back in phase.
- Cap or tape the transmission output and the pinion nut area to keep grit out.
- Spin each wheel by hand after removal. With the shaft out you should see the ring gear turn and hear nothing but gear lash.
- Strap the removed shaft in the truck bed or toolbox, never hanging loose under the frame.
If you are deciding whether to run this kind of recovery in-house, the equipment matters as much as the procedure, which is why a purpose-built semi tow truck is the right tool for long-distance recovery. Either way the rule holds: the driveline is the fuse. Pull it and the only parts spinning without oil are the ones designed to splash in it.
The table below maps every component that loses lubrication during a tow, what it normally gets, and what it does when the supply stops.
| Component | Normal Lubrication Source | Rotation State With Driveline Connected | Failure Mode After Prolonged Rotation | Removal or Mitigation Action |
|---|---|---|---|---|
| Transmission mainshaft and output shaft | Splash from mainbox gears; no pump drive with engine off | Spins at road speed with driveline connected | Gear bushing and shaft scoring, burnt oil, seizure | Remove driveshaft; cap output yoke; tag shaft for refit |
| Countershaft and gears | Splash from rotating gears; turns only with input shaft | Stationary in neutral while output spins, no splash | Gear face wear, false brinelling on idle bearings | Remove driveline; leave transmission in neutral; check oil level |
| Tapered roller bearings at the output | Oil thrown by mainshaft gears into return troughs | Rotate at road speed under no load | Spalling, bluing, axial play, eventual seizure | Remove driveshaft; verify oil level; inspect bearings after tow |
| Input shaft bearing | Splash from countershaft gears and front retainer oil | Stands still with engine off and clutch engaged | Rarely starves; heat soak from spinning mainshaft | Do not run PTO or engine during tow; leave input undisturbed |
| Rear differential ring gear and pinion | Ring gear dips in axle oil and slings it forward | Ring gear and pinion spin at wheel speed | Scoring if oil level is low or axle is lifted dry | Remove driveline; top off axle oil; never tow a dry lifted axle |
| Pinion bearings | Oil slung by ring gear; depends on correct oil level | Spin only through ring gear contact | Spalling, seal leaks, whine, then pinion play | Remove driveline; check level; plug pinion yoke opening |
| Wheel seals | Axle oil splash and hub bearing lubricant | Rotate with hub at full road speed | Lip burning, gear oil leaking onto brakes and drums | Removal does not help; inspect for leaks before the tow |
| Driveline center support bearing and universal joints | Sealed grease; carrier bearing preload, no external supply | Continuous high-speed rotation for the whole tow | Grease cook-off, bearing seizure, shaft whip, separation | Remove complete shaft; strap to frame; cap both openings |
Why 60 Miles Is the Threshold That Matters
Heat is not really an event. It is friction power integrated over time: roughly Q = μ·W·V·t, where W is load, V is sliding velocity and μ is the friction coefficient of whatever film is left. On a towed semi, road speed sets V and gross weight sets W. Time is the variable operators skip, and time is what turns a tolerable temperature into a destructive one. A 60 mile tow is not a longer version of a short move.
What Is Actually Turning Back There
With the driveline removed, the pinion is no longer driven by the transmission, but it is still driven by the ring gear at wheel speed. A typical drive tire turns a little over 500 rpm at 65 mph; through a 3.55:1 axle that puts the pinion near 1,900 rpm. Nothing in the housing pumps oil. Lubrication is splash from the ring gear dipping through the sump, with no cooler, no return line and no circulation loop to carry heat out of the bearing cones. In the gearbox, transmission lubrication has stopped: an automatic depends on the engine-driven pump, a manual depends on the countershaft throwing oil, and neither is turning. The gearbox is not idling through the tow. It is sitting dry.
The Progression, Stage by Stage
- Cold film depletion. Residual oil drains off the upper bearing surfaces within the first few miles. The pinion pilot bearing and the inner cone run on whatever film clings to the race.
- Housing temperature rise. Heat accumulates faster than the casting can reject it. Cover temperature climbs through the tow instead of leveling off.
- Oil degradation. Above roughly 250°F bulk oil temperature, gear lube oxidation accelerates sharply. Additive packages deplete, viscosity climbs, and the oil stops being a lubricant and starts being a contaminant.
- Varnish and deposit formation. Oxidized oil plates out on the cones and races, insulating them, holding heat in, and glazing the surfaces it was supposed to protect.
Why the Intermediate Stop Lies to You
The differential housing is a heavy cast-iron heat sink with a lot of thermal mass and little external surface area for the bearing contact patch inside it. Bearing temperature commonly runs 30-60°F hotter than the outside of the casting. A hand on the cover at a fuel stop, or an infrared reading of 190°F, tells you the iron is warm. It does not tell you the inner cone still has film. Damage accumulates through the stop and does not reverse when the housing cools.
The Three Multipliers
| Multiplier | Typical Range | Effect on Heat Load |
|---|---|---|
| Gross vehicle weight | 35,000-80,000 lb | Higher GVW raises load on the ring-and-pinion contact pattern; bearing load scales with torque reaction at the wheel, not with tow-truck capacity |
| Ambient temperature | 20-110°F | Sets the starting point and the temperature differential available for rejection; a 100°F day removes the reserve margin entirely |
| Tow speed | 45-70 mph | Pinion rpm scales linearly with road speed, and friction power scales with it, so a 10 mph increase is a measurable heat-rate increase sustained over the whole route |
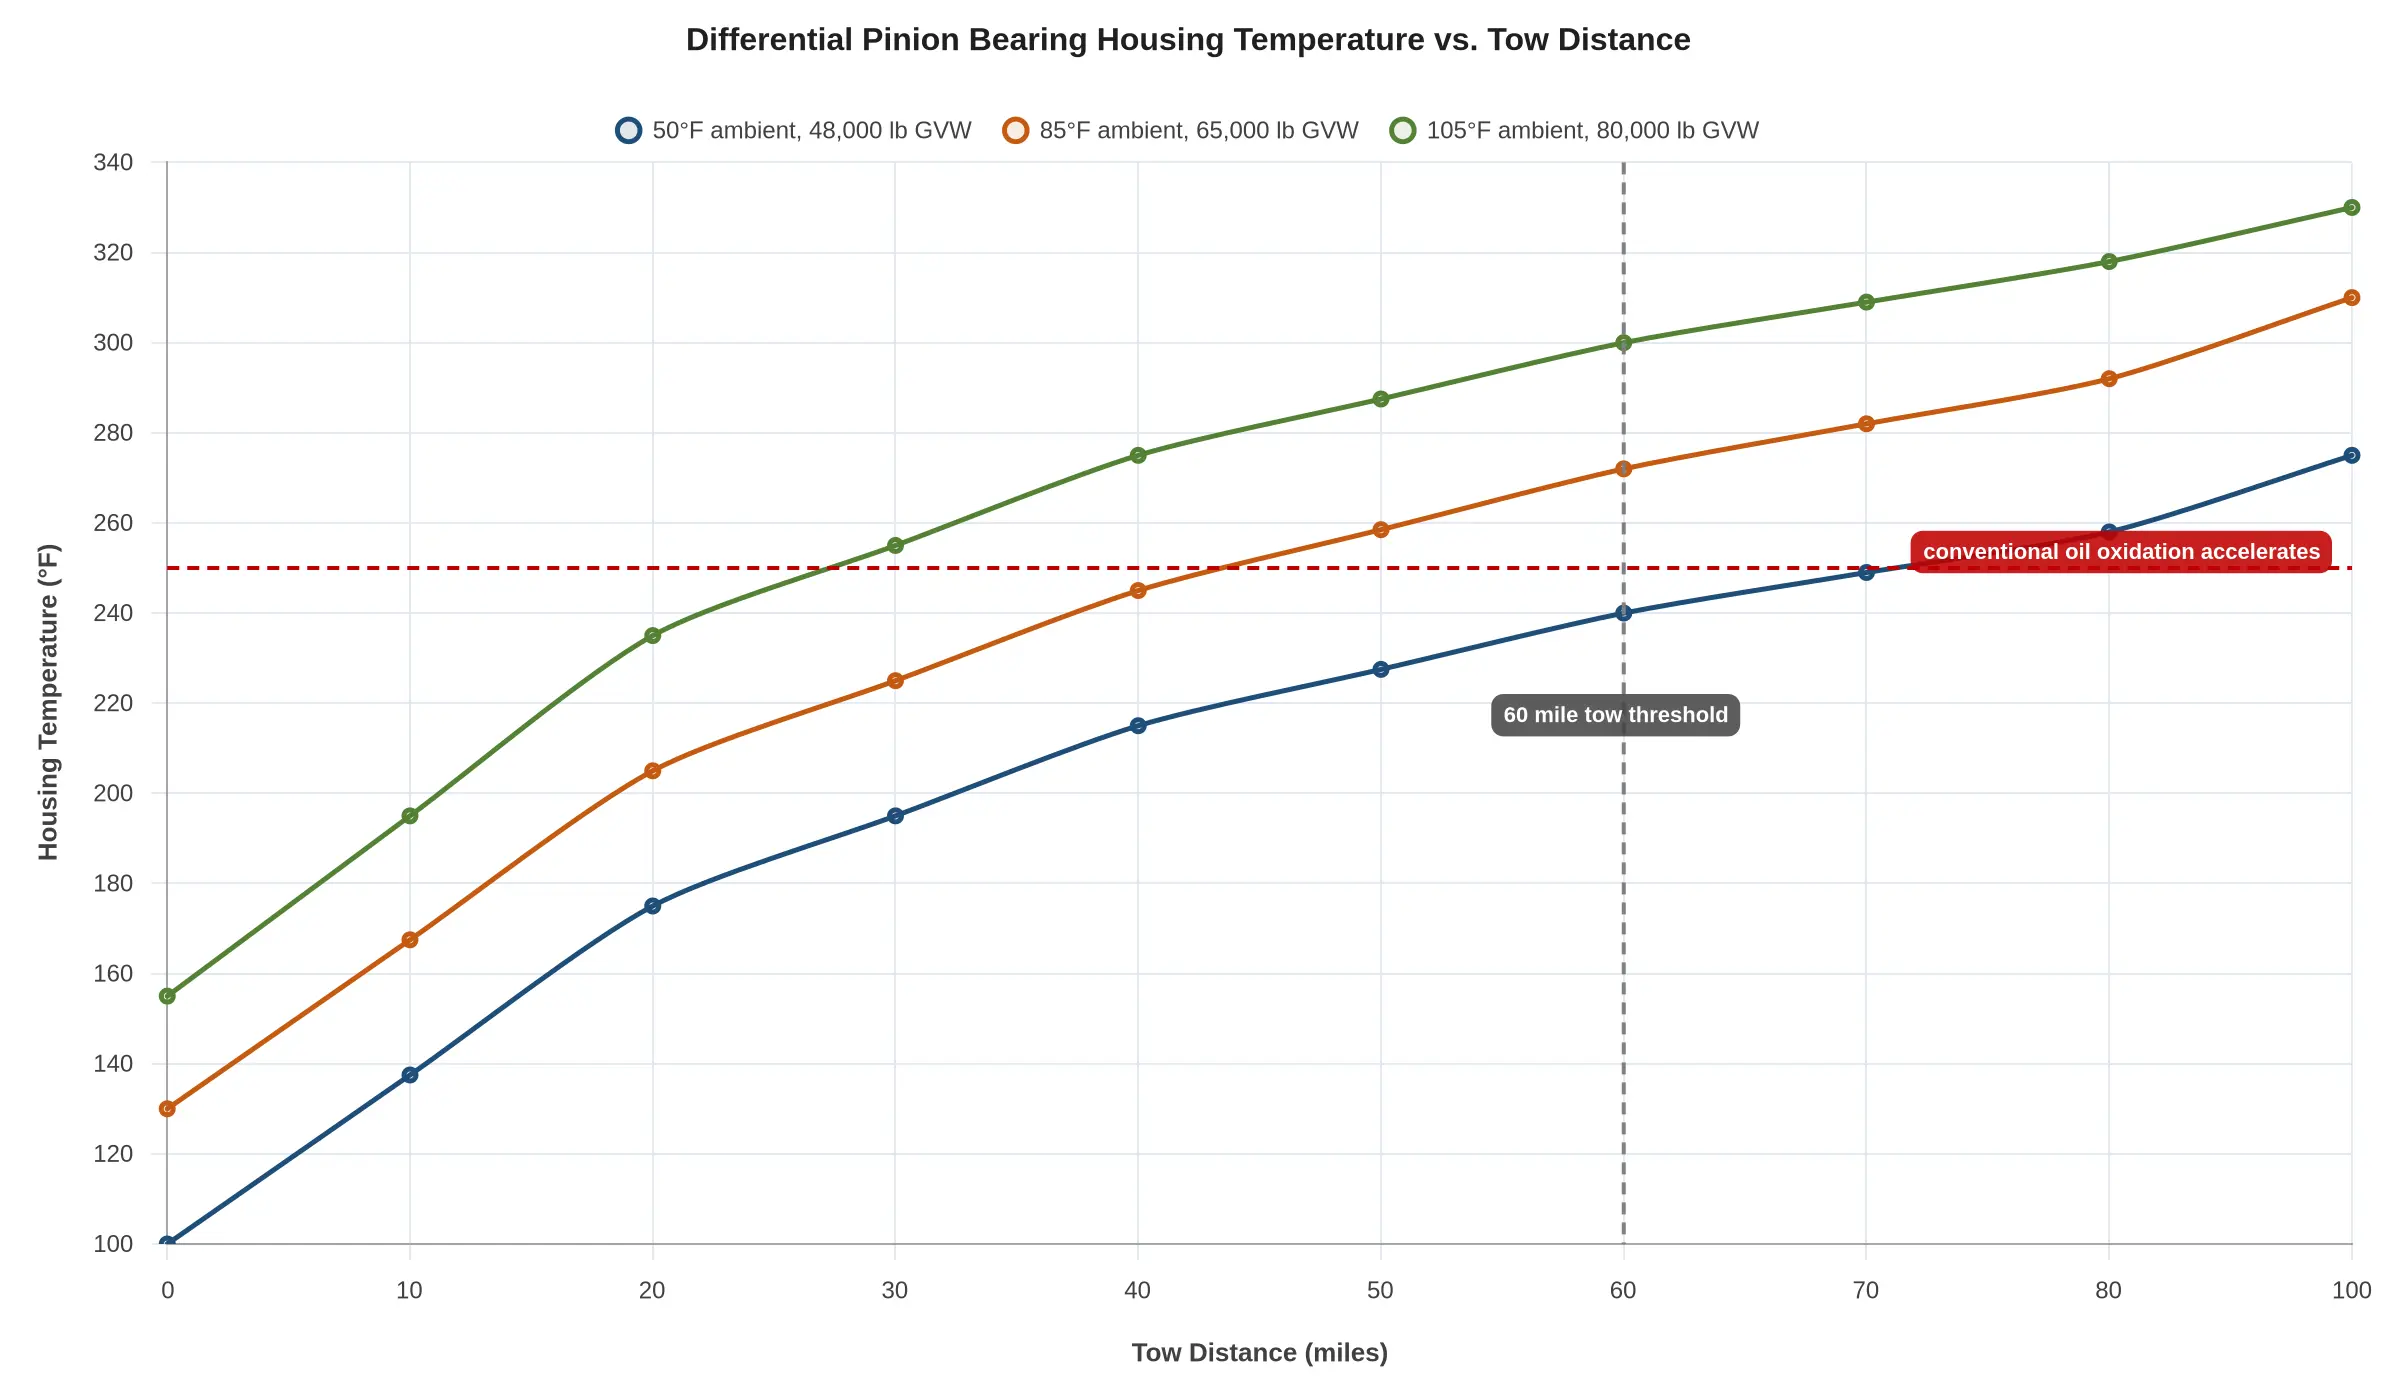
As the chart shows, the 60 mile mark is where the low-load line crosses into oxidation territory and the high-load lines are already well past it. Under 20 miles, splash lubrication and thermal mass absorb the error. Past 60, the bearing surfaces have spent most of the trip outside a stable film.
Not the Same Job
A yard move and a 60 mile tow are not mechanically equivalent, and no procedure should treat them that way. The yard move is a thermal transient: minutes of rotation that the housing mass absorbs without a meaningful temperature rise. The 60 mile tow is steady-state heat plus accumulation plus oxidative exposure, with no oil circulation to reset the clock. Where the shaft can stay in for a reposition, it comes out for a road tow, and the quote should reflect a real semi tow truck with the lift capacity and axle configuration to keep the rear wheels off the ground.
The threshold is not arbitrary. It is the distance at which time, speed and load have had enough exposure to convert a recoverable tow into a rebuild.
Where the Heat and Film Curves Cross
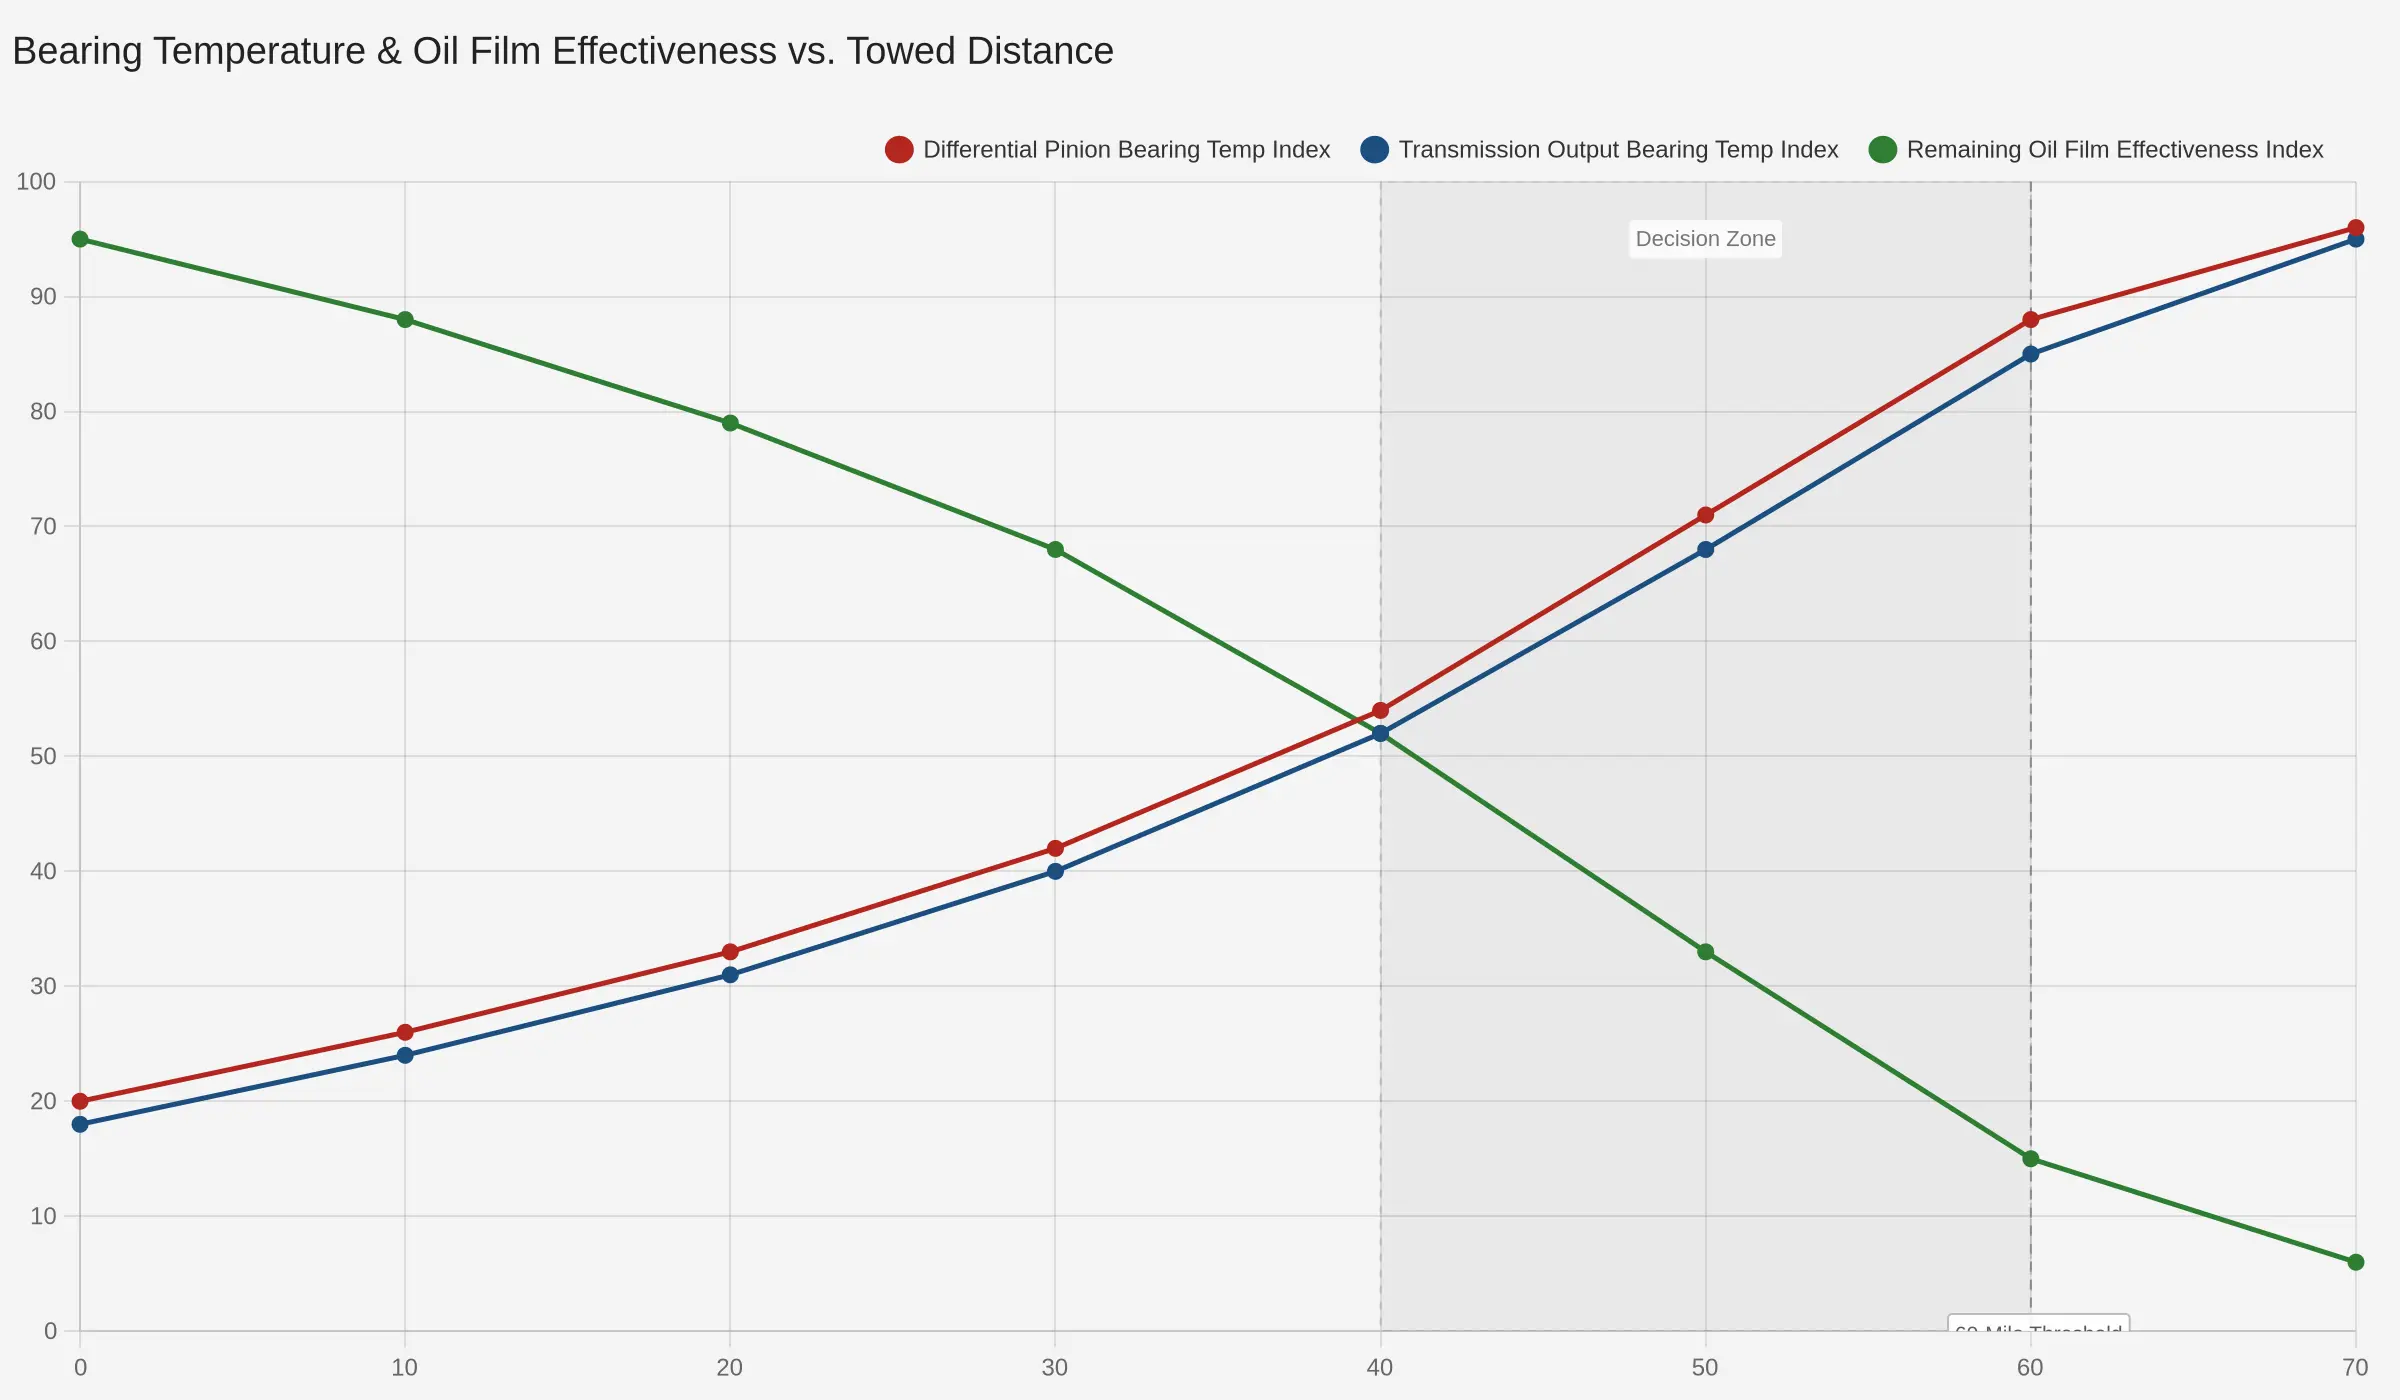
Two bearing sets keep spinning on a towed tractor with the driveline still bolted in: the differential pinion bearings and the transmission output bearings. The red and blue curves are their heat indices. The dashed green line is what is left of the oil film protecting them.
For the first 30 miles the numbers look comfortable, which is the trap. Bearing temperature climbs almost linearly because no pump is turning, while film retention falls faster than heat rises, so the lines close on each other. They cross at about 40 miles. After that the bearings run hotter than the film can protect, and between 40 and 60 miles there is no margin left, only a countdown.
Bearing heat indices climb while remaining oil film falls, crossing near 40 miles. Past that point the bearings run hotter than the film can protect, which is why the driveline comes out before the 60 mile mark.
Reading the Crossing Points
| Towed Distance | Pinion Bearing Temp Index | Output Bearing Temp Index | Remaining Oil Film Index |
|---|---|---|---|
| 0 mi | 20 | 18 | 95 |
| 20 mi | 33 | 31 | 79 |
| 40 mi | 54 | 52 | 52 |
| 50 mi | 71 | 68 | 33 |
| 60 mi | 88 | 85 | 15 |
| 70 mi | 96 | 95 | 6 |
The indices are relative, not temperatures in degrees, which is what makes them useful as a decision tool rather than a specification. The shape is the point: heat climbs on a straight line while lubrication falls off a cliff. A 30 mile tow is still inside the window where residual splash and cling film do their job. At 40 miles you are at the crossing. At 70 the difference in bearing life is measured in thousands of miles, not hundreds.
That is the practical case for pulling the driveline, strapping it in the deck and confirming the yoke is sealed before you roll.
Driveline Removal Procedure: Step by Step Before the Tow
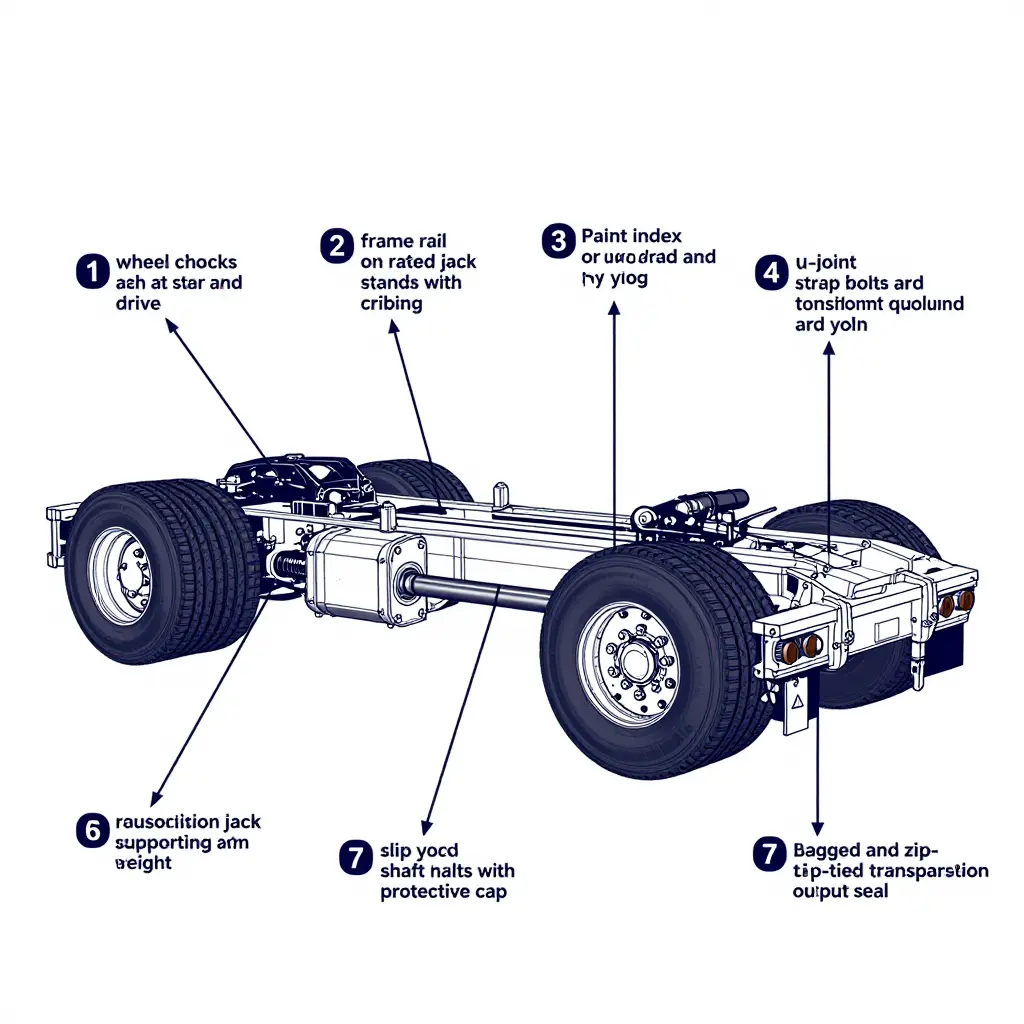
Before a 60 mile tow the driveshaft comes out, not because it is convenient but because an output shaft turning with no oil supply destroys bearings, seals and gear train in a few hundred miles. Work the sequence in order and do not skip ahead.
- Park and chock the unit on hard, level ground. Set the tractor brakes, drop the landing gear if the trailer stays put, and chock both faces of at least one steer tire and one drive tire with rated wedges. Do not trust a parking brake, an air system or a gear selector to hold a loaded tractor while you are under it.
- Cage the spring brakes before you release anything. Air pressure is what holds spring brakes off, so releasing the park brake and then bleeding the system will simply set them again. Cage them mechanically per the OEM procedure, isolate the tanks, bleed every circuit to zero and confirm zero on a gauge. The tow unit can recharge the system at hookup. A caged or partly released chamber stores lethal energy, so stay out of line with the pushrod.
- Mark the shaft-to-yoke orientation before anything rotates. Index the transmission yoke, the slip splines and the differential yoke with a paint pen or punch mark. A shaft reassembled 180 degrees out, or one spline off, will produce a vibration that hammers U-joints, output seals and pinion bearings within a few hundred miles.
- Support and block the frame with rated cribbing. Set jack stands or hardwood blocking under the frame rails, sized for the loaded axle weight, and lower the suspension onto them. Never work beneath a chassis held up only by a hydraulic jack, an air bag or a wheel lift.
- Break and remove the U-joint strap bolts (or flange nuts) in sequence. Crack the fasteners with a six-point wrench, then back them out diagonally in a cross pattern, two threads at a time, so the joint does not cock and bind on the caps. Torque note: figures vary widely by joint series, from roughly 20-35 lb-ft on light strap yokes to 50-70 lb-ft on many Class 8 joints; use the OEM figure for the joint in front of you, replace any fastener with damaged threads, and never reuse a stretched flange nut.
- Support the shaft before the last fastener comes out. Get a transmission jack, a sling or a second set of hands under the tube first. A two-piece Class 8 shaft assembly weighs far more than it looks, and a dropped shaft will crush fingers, crack a yoke ear or knock the output seal out of the housing.
- Pull the slip yoke and cap the splines immediately. Slide the shaft rearward out of the output yoke, then tape or plug the slip splines and cap the joint bores. Do not let the shaft hang from the output while you reach for tools: the seal lip takes the load and will leak, and grit on exposed splines will chew the bushing on the way back in.
- Bag and seal the transmission output opening. Double-bag it with heavy poly, secure the bag above the seal lip with a zip tie, then tape the seam. A single thin bag tears on the shaft end, and road debris or rain finds the output bearing and rear seal.
- Tie up and secure the removed shaft or shaft halves. Strap the assembly to the frame rail or lay it in the deck tray, ends capped and protected, tagged with the unit number and date. Never hang it by a joint cap or the slip yoke, and never leave it where it can slide into a fuel tank or an air line.
- Torque any retained fasteners you disturbed. Re-torque companion flange hardware, center bearing bracket bolts and any yoke nut you loosened to the OEM figure with a calibrated wrench, and paint-mark each fastener after it is checked. An impact gun run “good and tight” gives you no verifiable value, and a loose flange bolt will walk out before the tow is over.
- Record the removal on the tow ticket. Note the time, which shaft or shaft half came out, the tag number, the fasteners kept versus bagged, and the name of the tech who did the work. The entry is what you show at a roadside inspection, and what tells the receiving shop what condition the driveline is in.
- Confirm the axle shaft alternative where it applies. Where the problem is the differential itself – a leaking housing, a suspect level, a damaged gearset – pull both shafts on every drive axle, cap the hub flanges and mark shaft side orientation. Remove both or neither: a single shaft left in keeps that wheel driving the differential, and the truck can still roll. Remember the unit will not move under its own power once the shafts are out.
- Sweep the underside before anyone signs off. Walk the full length of the unit, confirm every cap and bag is seated, every strap is tight, every tool is accounted for, and no fastener bag is sitting on a frame rail.
Removal is not complete until a second qualified person has physically inspected the capped output, the secured shaft and the torque marks, then signed the tow ticket. No truck moves, not one foot, until that happens.
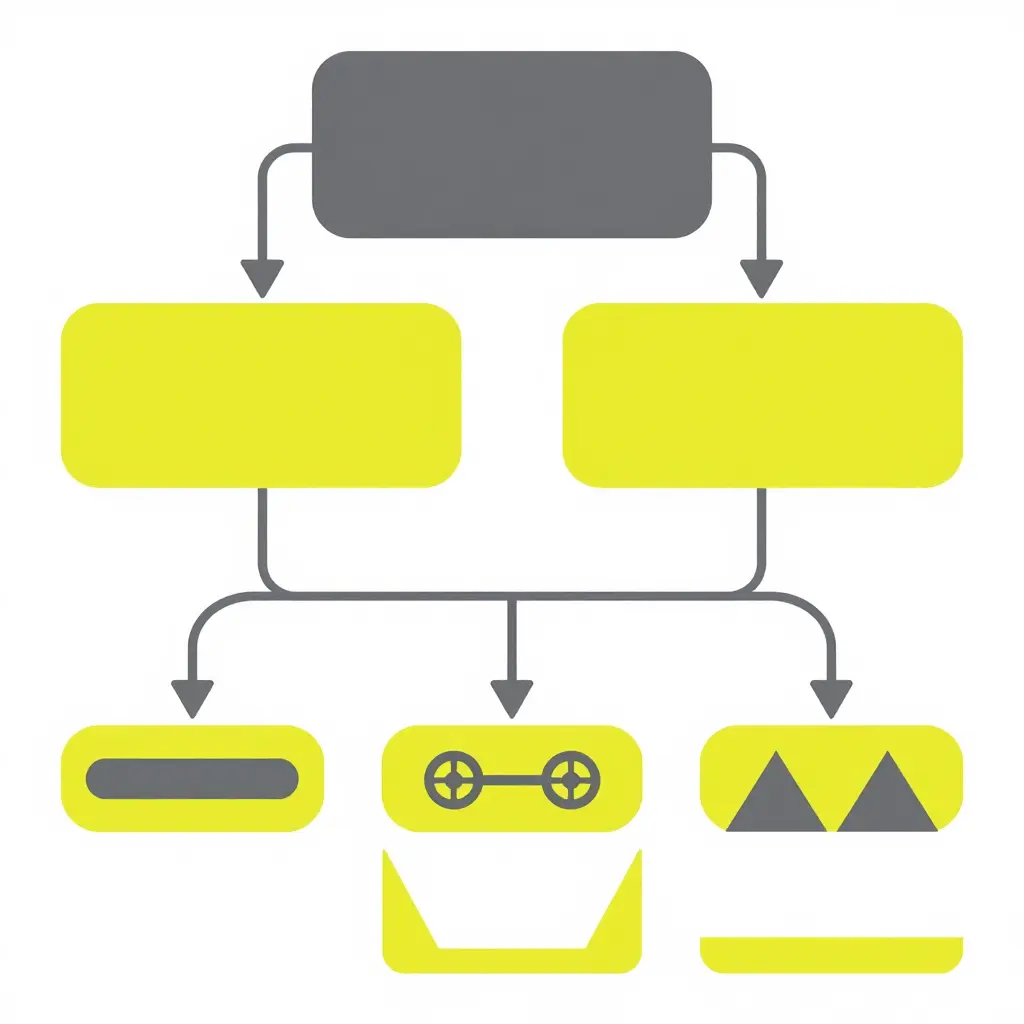
The tree sorts by tow distance first, then by driveline configuration. Every path ends at one of three actions – pull the full driveshaft, pull the rear axle shafts, or load the unit on a trailer. Match your own setup to a branch, then follow it to the terminal.
Alternatives to Full Driveshaft Removal
Full removal is the reference standard for a reason: pulling the shaft, or the interaxle shaft on a tandem, stops the output, mainshaft and countershaft while the ring gear and pinion keep rolling in the oil bath built to sling it. Over 60 miles that is the difference between a warm carrier and a dry mainshaft bearing. It is not always possible. A seized yoke, a shaft already broken at the flange, or a tractor buried to the frame can put the standard procedure out of reach. Three alternatives get debated on the shoulder, and they are not equivalent. For a semi tow truck crew, one question should drive the choice: what is still turning, and what is feeding it oil?
Rear Axle Shaft Removal (Full-Floating Drive Axles)
Mechanical condition: pulling the shafts on every drive axle – all four on a tandem, not two – decouples the wheel ends from the carrier. The hubs freewheel on the spindle bearings, the carrier sits stationary, and with nothing driving the power divider the main driveshaft stops as well. Pull the shafts from one axle only and the other axle back-drives the power divider: the interaxle differential and the now-free pinion spin at close to double speed with nothing slinging oil at them.
Lubrication consequence: the ring gear stops, so splash stops with it. Oil-lubricated wheel ends on a loaded hub at highway speed now depend on whatever oil migrates down the spindle, which is marginal if the housing is at the low end of the fill spec. Cap the bores; an open hub throws oil and swallows grit. A driveline-mounted park brake is also dead once the shafts are out.
Handling and weight-transfer limit: nothing about weight transfer or steering improves. The tractor still rolls on its own tires, unsteered, carrying its full share of weight, so a dragging brake, a seized wheel bearing or a damaged casing becomes the failure point, with no driveline telltale to warn you.
Lowboy or Sliding-Axle (Landoll-Style) Trailer
Mechanical condition: the tractor never rolls under tow. Every wheel is stationary – no gear train, no carrier, no hub rotation. Nothing needs disconnecting.
Lubrication consequence: effectively nil. Oil stays where gravity put it: no migration, no bearing heat, no seal stress. This is the only configuration where the lubrication question does not exist.
Handling and weight-transfer limit: the constraints are logistical – deck height and overhead clearance, ramp angle or tilt geometry, securement and bridge loading, combination length and off-tracking, and the fact that the trailer has to physically reach the disablement. A soft shoulder, a low bridge or a shoulder drop-off all argue against it.
Front-End Lift With a Steerable Dolly
Mechanical condition: the wrecker carries the steer axle and a steerable dolly carries the rear tandem. It is a genuine improvement in steering, tire preservation and tow-truck rear-axle loading, and it changes nothing about rotation. All rear wheels still roll, so carrier, pinion, driveshaft and transmission output all turn. Neutral does not save you: the mainshaft is splined to the output and spins while the countershaft that lubricates it sits still.
Lubrication consequence: identical to a straight rolling tow. Towing a semi truck this way for 60 miles at highway speed will cook a dry mainshaft bearing as surely as dragging it on a hook, and automated or automatic gearboxes with engine-driven pumps fare worse. Driveshaft removal or pulling the axle shafts is still mandatory, so the dolly buys handling margin, not lubrication margin.
Handling and weight-transfer limit: dolly capacity and its own tire and bearing condition, added articulation and length, and the front lift dumping steer-axle weight onto the wrecker’s rear axle, which can push you over legal axle loading. Lift geometry matters more than most operators expect; understand how a front axle lift loads the rear axle before you commit to a hook height.
Which Configuration Actually Solves the Rotation Problem?
| Configuration | What still turns | Oil exposure | Hard limit |
|---|---|---|---|
| Full driveline removal (baseline) | Ring gear, pinion, wheel ends | Carrier splash-fed as designed | Shaft access, yoke re-torque, no engine braking |
| Axle shafts pulled (all drive axles) | Hub assemblies only | Wheel-end bearings rely on oil migration | Open bores, no park brake, unsteered |
| Lowboy / sliding-axle trailer | Nothing | None | Deck height, securement, site access |
| Front-end lift + steerable dolly | Entire driveline | Transmission mainshaft runs dry | Dolly capacity, articulation, axle loading |
Only two configurations remove the rotation problem outright: the trailer, which stops everything, and full driveline removal, which stops the dry-running driveline and leaves the splash-lubricated carrier to roll exactly as designed. Rear axle shaft removal stops driveline rotation too, but moves the lubrication exposure onto the wheel ends. A front-end lift with a steerable dolly removes nothing – it is a handling solution, not a lubrication one.
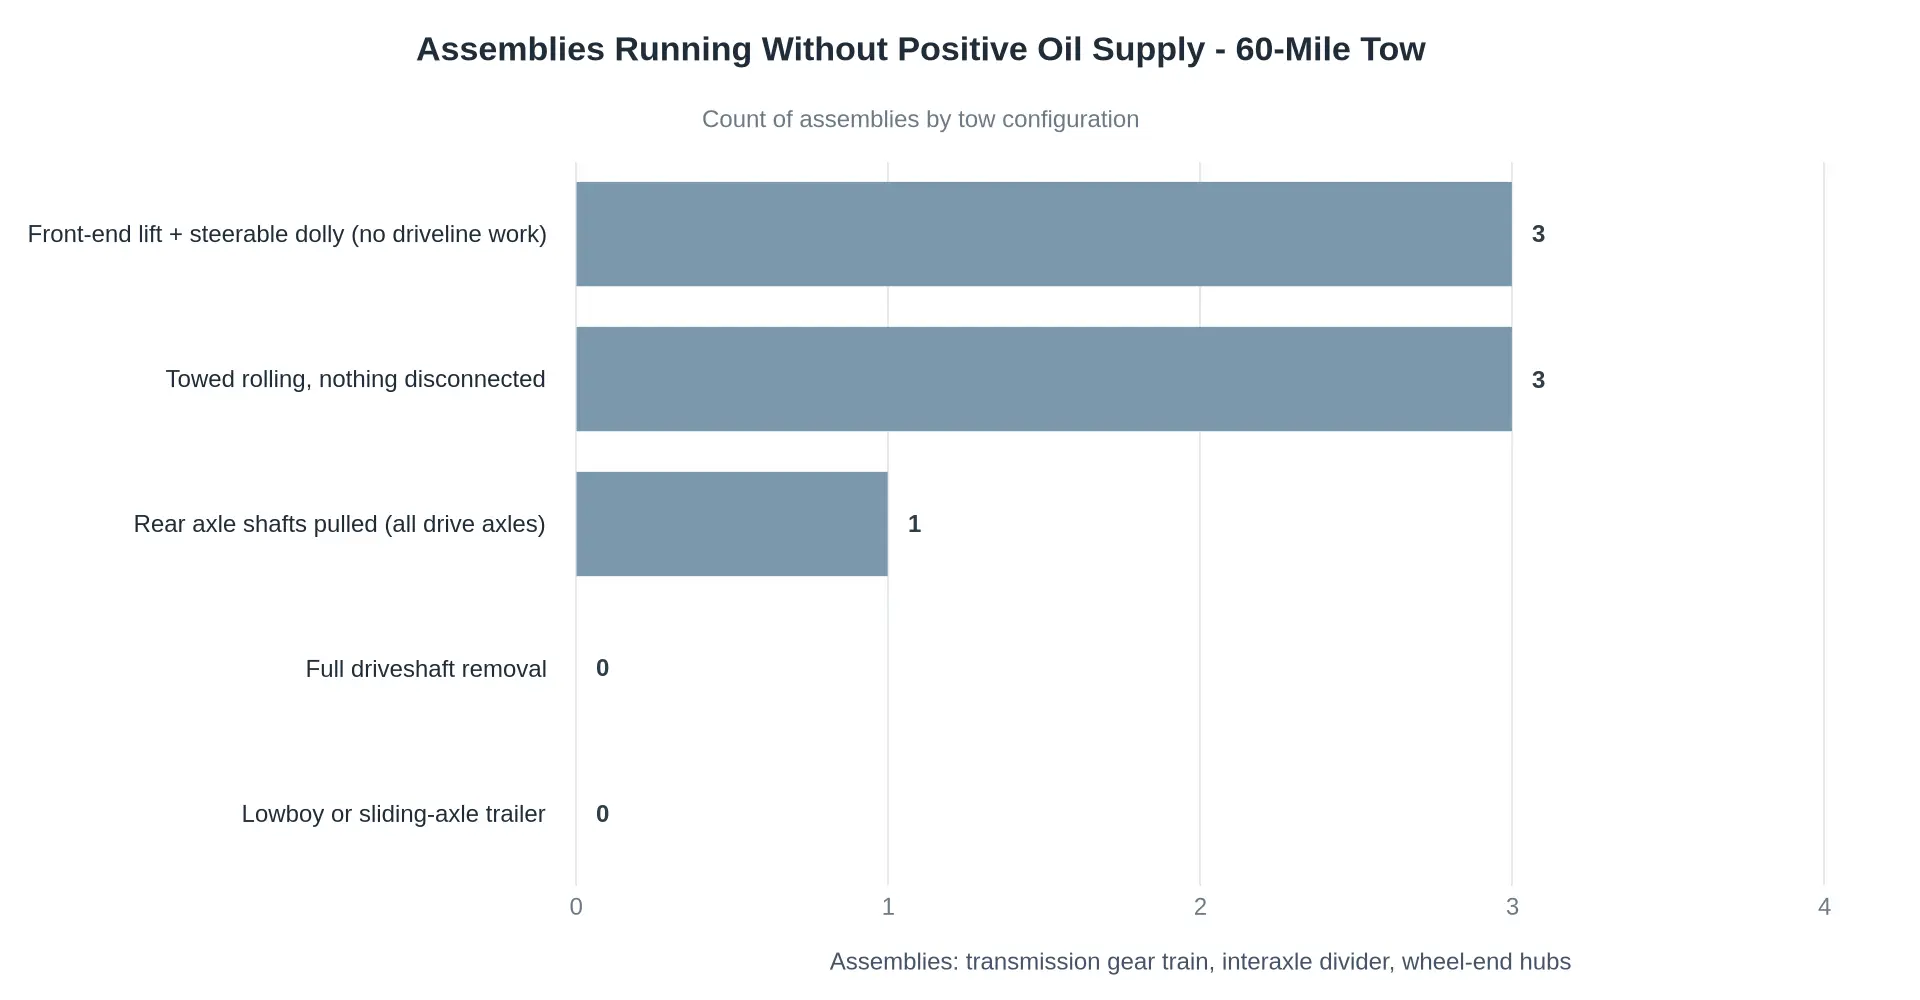
Figure: assemblies running without positive oil supply during a 60-mile tow, by configuration.
Driveline Removal Reference: Tools, Torque and Verification
The table pairs each fastener and support step with tooling, a torque range and a verification check, and flags where the figure depends on confirmed manufacturer service data.
| Task Element | Required Tool or Specification | Torque or Limit | Verification Check | Consequence If Skipped |
|---|---|---|---|---|
| Universal joint strap bolts | 1/2-inch drive 12-point socket, calibrated torque wrench, penetrating oil | 20-35 lb-ft typical. Confirm in OEM service data. | Strap sits flush in yoke; each bolt threads in by hand first | Strap lets go under load; shaft drops and tears airlines, tanks, brake chambers |
| Flange nuts (companion flange to differential) | 15/16-inch or 1-1/8-inch six-point socket, breaker bar, torque wrench | 45-75 lb-ft typical. Confirm in OEM service data. | Paint-mark nuts to flange before loosening; nut shoulders sit flat, no pulled threads | Loose flange nuts shear or back off; pinion bearing preload lost, differential damage |
| Slip yoke cap | Correct-diameter expanding plug or slip yoke seal cap, clean shop rag | Hand tight plus one quarter turn. Plug OD matched to spline bore. Confirm fitment. | Cap cannot be flicked off; no fluid weeping after ten minutes standing | Transmission drains through open spline; output bearing spins without oil on the highway |
| Output shaft sealing | New output shaft seal or spline plug, seal driver, gasket scraper, brake cleaner | Seal seated 1-2 mm below bore lip; no torque value. Confirm depth in service data. | Wipe dry paper towel under output after fifteen minutes; zero fluid film | Slow lube loss over 60 miles; output bushing and bearing score, transmission rebuild |
| Driveshaft support blocking | Soft slings or cribbing rated at twice shaft weight, wooden blocking, load straps | Sling capacity minimum twice shaft weight. Confirm rating tag before lifting. | Shaft supported within 6 inches of original angle; sling clear of joints and seals | Hanging shaft bends, strains yoke ears and transmission output bearing, unbalances at speed |
| Axle shaft retaining bolts (alternative method) | Axle flange socket set, drain pan, new gaskets or flange seals, torque wrench | 45-90 lb-ft typical per stud. Confirm in OEM service data. | Both shafts pulled, wheels no longer drive differential; pan catches released lube | Rolling wheels spin a dry differential; ring, pinion and carrier bearings fail on the tow |
| Post-removal second-person confirmation | Second qualified technician, written checklist, photo of both disconnected ends | No torque value; 100 percent sign-off with two signatures before the truck rolls | Second tech physically confirms both ends disconnected and shaft secured in cradle | Missed shaft spins behind the wrecker; driveline whips and causes damage plus liability |
Every torque figure above is a working range, not a substitute for the OEM service manual for that axle and transmission pair. Crews who run these checks daily also care about the iron underneath the load, which is why so many operators end up specifying a dedicated semi tow truck.
Safety and Liability Warnings for Driveline Removal
Driveline removal is high consequence because it releases stored energy in the air system, exposes components that can still turn under residual torque or grade roll, and puts a heavy, awkward shaft in a technician’s hands. Each item pairs one hazard with the control that keeps the job repeatable, so treat the list as a pre-job checklist rather than a reminder.
- Unchocked wheels on a unit that no longer has a mechanical lock. Hazard: with the shaft out, the rear wheels are no longer tied to the transmission, so any grade, soft shoulder or driveline wind-up can let the chassis creep. Control: chock both faces of at least two wheels on firm, level ground, block the frame if the suspension is being unloaded, and re-check the chocks after any load shift.
- Parking brake released at the wrong point in the sequence. Hazard: caging spring brakes or releasing the park brake to “roll the yoke into alignment” before chocks and blocking are set turns a static job into a moving one. Control: chock and block first, then follow the OEM caging and release sequence exactly, and never release the park brake to index a U-joint.
- Air system not isolated before hands go near the yoke. Hazard: stored energy in the wet and dry tanks can apply service brakes or release spring brakes unexpectedly while a technician is underneath. Control: isolate the tanks once the spring brakes are caged, bleed every circuit to zero, tag the valves, and confirm zero pressure on a gauge before reaching in.
- Hot exhaust and live rotating components in the work zone. Hazard: recently run exhaust piping and a spinning fan, damper or pulley will burn or grab. Control: allow a cool-down period, verify surface temperature with an infrared thermometer, lock out the engine so it cannot be started or bumped, and keep hands clear of belt-driven accessories.
- Driveshaft strap bolt failure during breakaway. Hazard: seized, corroded or previously over-torqued strap bolts shear or strip, sending caps and needle bearings across the shop floor and taking the technician’s leverage with them. Control: apply penetrant, use the correct six-point socket, support the shaft before the last bolt comes out, and replace strap hardware and self-locking nuts on every removal rather than reusing them.
- Pinch points at the slip yoke and splines. Hazard: the slip yoke traps gloves and fingers, and the shaft can shift axially under residual load as it separates. Control: carry the shaft on a sling or transmission jack, keep hands open and flat rather than wrapped around the splines, wear fitted gloves, and treat the shaft as loaded until it is fully clear.
- Road debris ingestion into an open output housing. Hazard: once the shaft is out, the output seal and the pinion area are open to grit, water and salt, which destroys seals and bearings long before the next service interval. Control: cap or bag the output, plug and tape the pinion yoke, and record which caps were installed.
- Dropped shaft mass and manual handling. Hazard: a complete shaft assembly, or a coupled tandem section, is heavy, unbalanced at the ends and easy to lose grip on from underneath. Control: use a two-person lift or a sling and hoist, never try to catch a falling shaft, and stage it on blocking clear of the work zone.
- Incomplete documentation of the removal on the work order. Hazard: with no written record of what came off, what was torqued, what was capped and where the hardware went, the next crew has to guess. Control: log the time, which shaft or section was removed, hardware disposition, caps and plugs installed, and the technician’s initials, and attach a photograph to the work order.
Incomplete removal records are a liability problem because they erase the evidence chain exactly where disputes start. If a shaft backs out on the road, a seal leaks, or a carrier asks whether the tow was set up correctly, the work order is the document that shows who removed what, when, and under which control measures. A one-line entry with a time stamp, hardware disposition and initials costs almost nothing at the bay and does a lot of work later. Shops that have been through a claim tend to build the record into the procedure instead of treating it as paperwork.
Post-tow damage: 20 miles versus 60 miles without driveline removal
When the driveshaft stays bolted up, the upper gear train and the pinion keep spinning on residual splash with nothing pumping oil to them. The chart shows how that exposure compounds over distance: short local moves leave mostly survivable wear, while a full 60 mile tow pushes several components past the point of measurable damage.
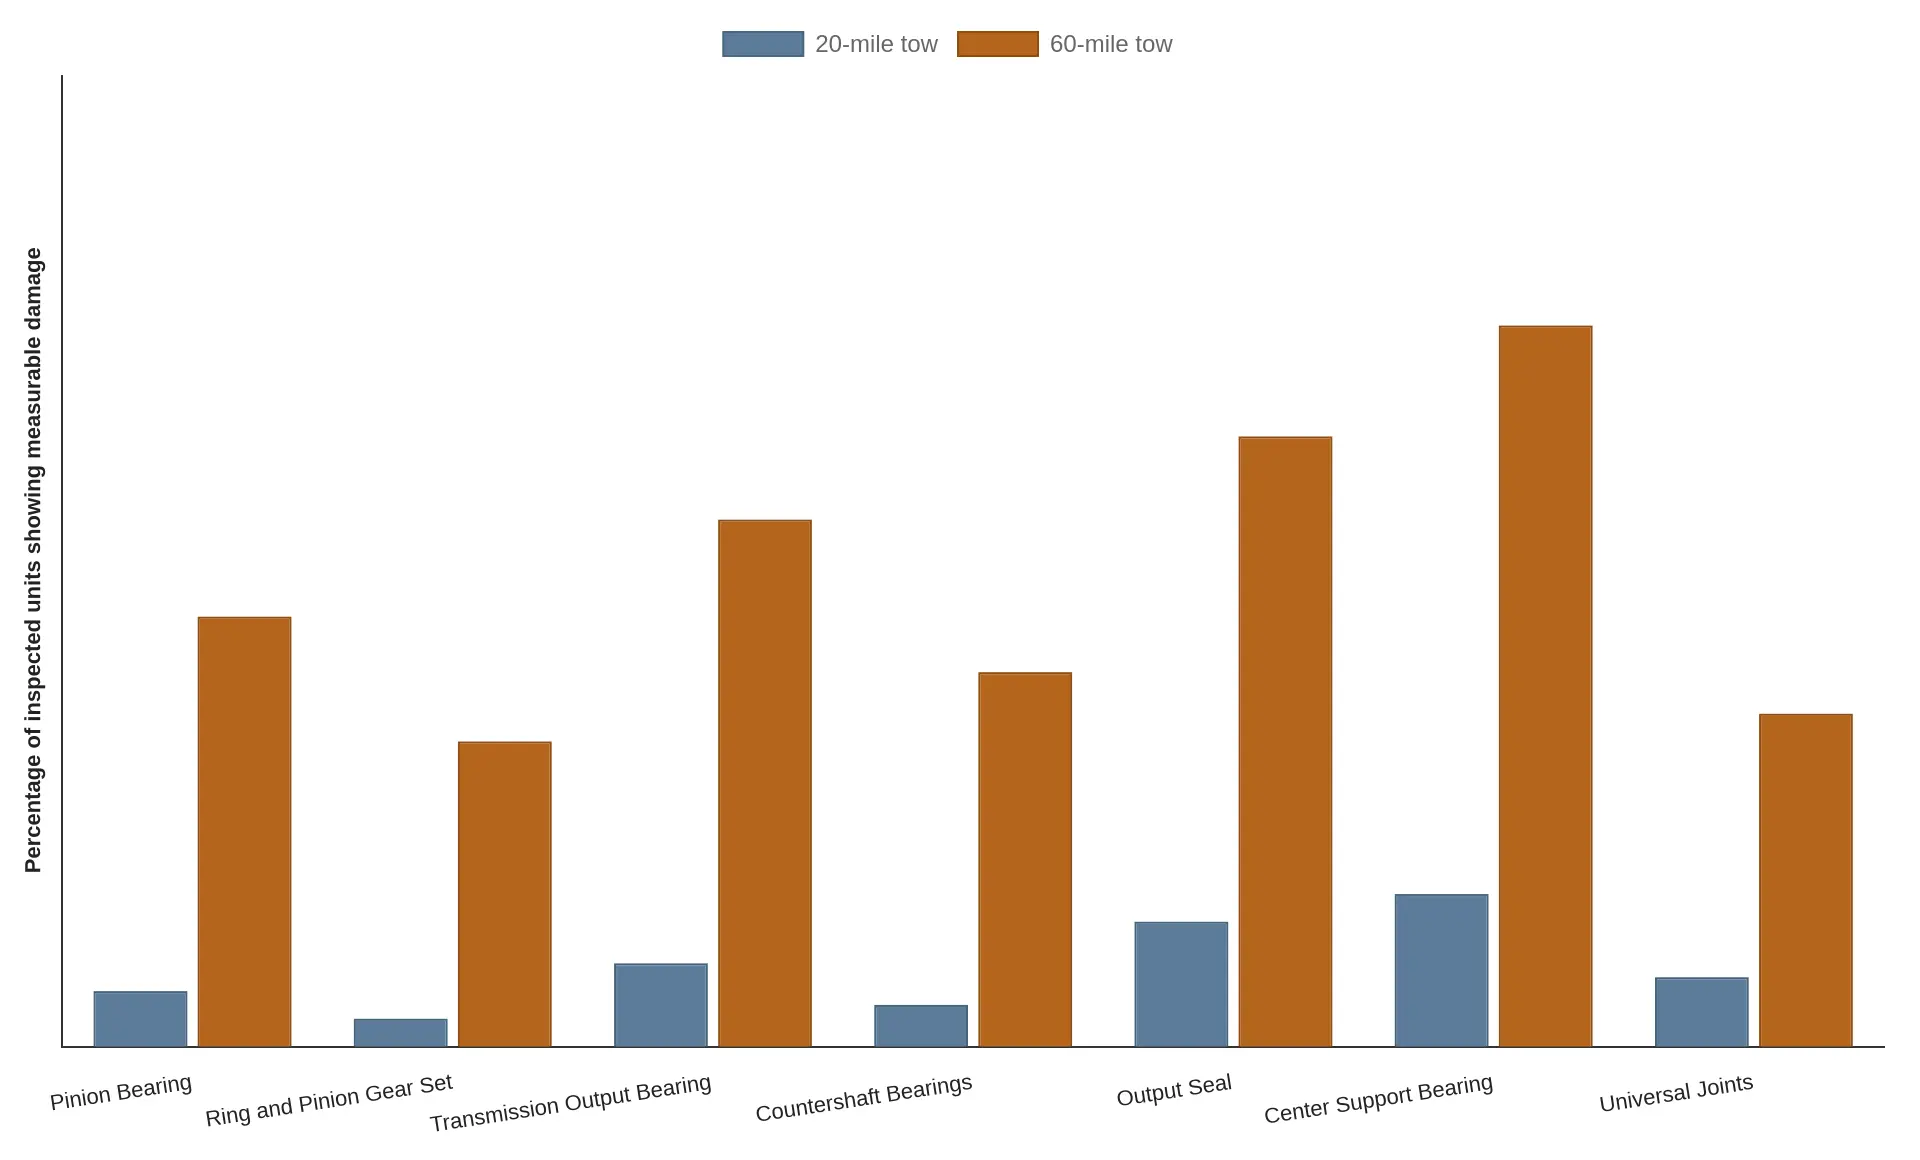
Damage climbs sharply between 20 and 60 miles once lubrication stops reaching the spinning upper gear train. Seals and support bearings fail first; the transmission output bearing follows.
Post-Tow Inspection and Reinstallation Checklist
Pulling the shaft buys a safe 60 miles, but the reinstall is where most comebacks are born. A driveshaft that rode strapped to a deck for two hours has been handled, bounced and re-bolted by someone working fast in poor light. Treat the reinstall as a scheduled repair, not as a simple reversal of the removal.
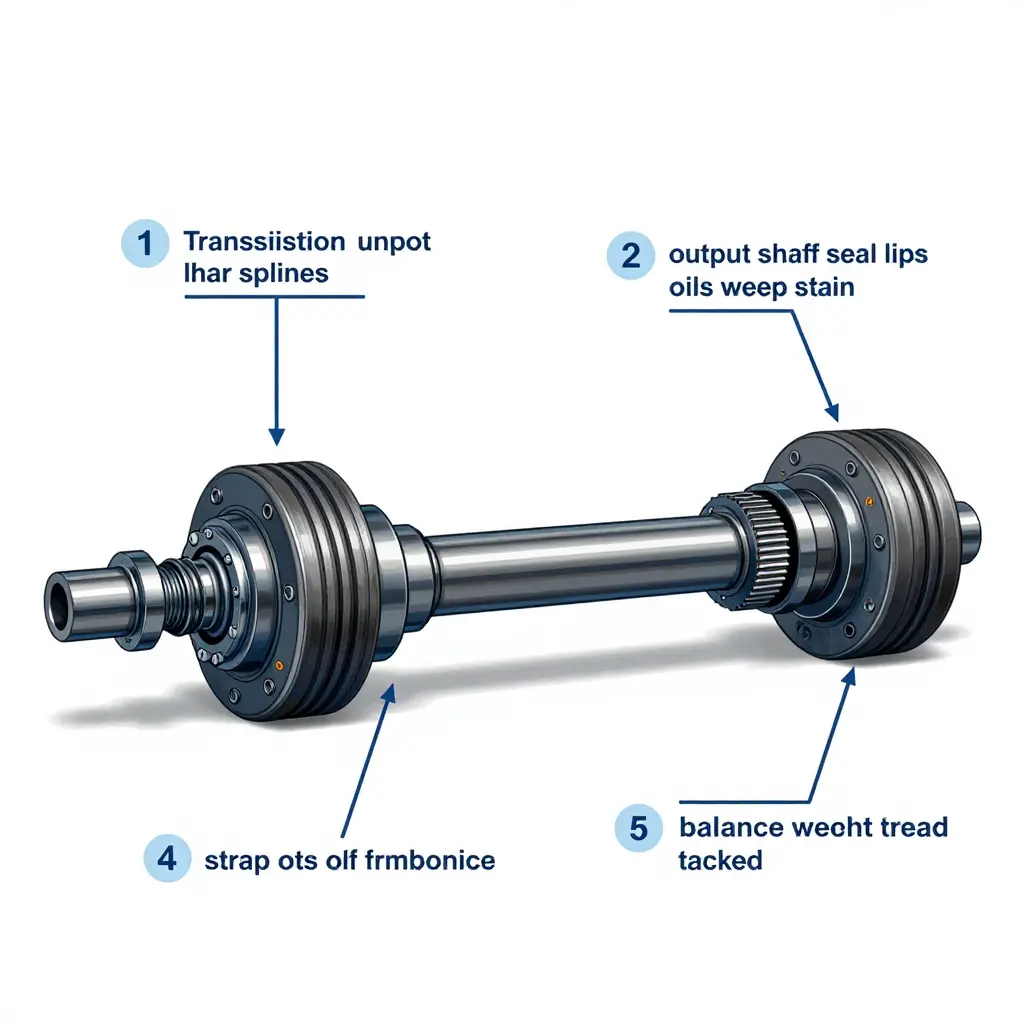
Inspection Points Before Anything Goes Back In
Work the list with the shaft on a bench, not on your chest under the truck.
- Output shaft splines. Look for fretting, twisted teeth, a wear step, or a polished band where the slip yoke has been running dry. A visible step or rock in the yoke means new hardware, not a greasing.
- Seal lip and oil weep. A fresh weep trail running rearward from a transmission or differential seal will become a leak under load. Replace the seal, and check the yoke sealing surface for a groove.
- Universal joint play. Rotate each cap by hand. Any perceptible radial or axial movement, rusty dust or a dry cap earns a new joint. Grease will not pull a needle bearing back into service.
- Strap bolts and thread damage. Reject stretched threads, rounded hex heads, missing lock tabs, and any bolt that threads in by hand past the point it should stop. Dirt in the bolt holes gives a false torque reading.
- Balance weight integrity. Cracked tack welds, a missing weight or a dented tube from a chain or strap all mean the shaft gets rebalanced before it spins at highway speed.
- Differential oil level and magnet debris. Pull the fill plug and confirm the level is at the hole. A fine paste on the drain magnet is normal; metallic fur, flakes or chunks are not. If any part of the driveline turned during the tow, the differential is the first thing to audit, because a dry pinion will not survive the trip home and the evidence disappears once the oil is topped off.
Reinstallation Sequence
Clean both mating faces, then slide the slip yoke onto the output shaft with the splines phased exactly as marked during removal. If you did not mark it, align the yoke ears so both universal joints sit in the same plane and the joint crosses stay parallel; a shaft installed out of phase will vibrate at speed and beat up the tail housing. Install the rear flange or companion yoke first, then the front, keeping the caps square in the saddles so no needle bearing tips. Every strap bolt, U-bolt nut and companion flange fastener that is torque-to-yield, corroded, previously stretched or damaged must be replaced with new hardware of the correct grade. Reused torque-to-yield bolts have already yielded once and will not hold clamp load.
Torque to the manufacturer’s specification with a calibrated wrench, in the sequence specified, and verify each fastener a second time with a paint mark. Do not substitute an impact gun for a torque wrench on final tightening.
Road Test and Documentation
Road test at low speed first, roughly 5 to 15 mph in a quiet lot, listening and feeling for a rhythmic vibration, a clunk on load reversal, or a shudder through the floor. Only then run a short highway loop at operating speed. Record the differential oil level and the magnet findings on the repair order, with the date, mileage, technician initials and photographs of anything abnormal. That entry is your protection if a bearing fails 5,000 miles later, and the only proof the differential was checked after the tow.
Building Driveline Removal Into Fleet and Towing Policy
A removal decision that lives only in the head of your most experienced operator is not a policy, it is a liability pattern. With the engine off during a tow, a manual gearbox has no splash and an automatic has no pump, and the output shaft, mainshaft and pinion bearings are being driven by the wheels with nothing circulating over them. On a short pull the residual film is enough. Past thirty miles at highway speed it often is not, and the failure shows up weeks later as a scored pinion nobody can trace back to the tow. The fix is procedural: write the trigger into dispatch standards, price it honestly, train to one document, and record the outcome on the ticket.
Writing removal into dispatch standards by distance band
Distance is the easiest defensible trigger, but pair it with load condition and lube history. Publish the bands in the dispatch manual and give dispatchers authority to hold a truck at the yard until the band requirement is met.
| Distance band | Dispatch standard | What still turns without oil | Ticket requirement |
|---|---|---|---|
| 0-15 mi | In-place tow permitted if lube levels verified and no leak reported | Output shaft, mainshaft and pinion bearings at low speed, brief duration | Lube check note, start and end time |
| 15-30 mi | Supervisor decision; remove if lube history is unknown or a leak is present | Countershaft and output bearings, no pump pressure | Decision plus approving supervisor name |
| 30-60 mi | Removal mandatory, or lift the rear axle and pull axle shafts | Full gear train and pinion bearings running dry | Removal status, tag number, photo |
| Over 60 mi | Removal mandatory; shaft separated, openings capped and plugged | All downstream components plus differential internals | Complete handoff block signed by shop and customer |
Apply the band to the towing configuration as well as the mileage. A front-axle lift on a tractor leaves the rear wheels rolling, so the band applies in full; a full rear lift changes what spins and should be stated explicitly in the standard rather than assumed.
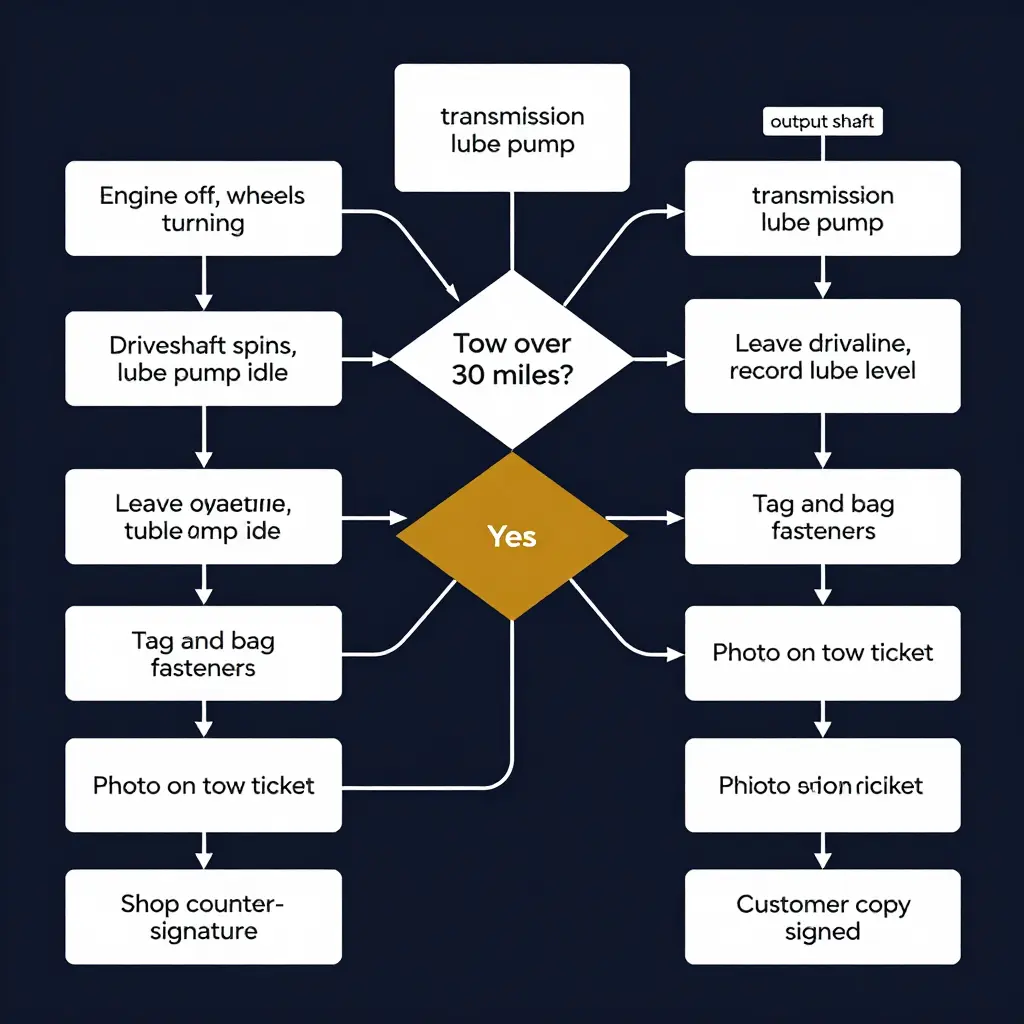
Costing labor against the risk of a scored pinion or burned bearing
Do not compare a fifteen-minute removal against a repair quote in isolation. Cost the decision as expected exposure:
Expected exposure = (probability of damage x repair cost) + downtime cost
As a planning range rather than a quote, a ring-and-pinion set with bearings and setup typically lands in the low thousands of dollars per drive axle, and a transmission bearing failure or partial rebuild lands higher before you add lost revenue for the days the unit sits. Removal labor is predictable, small by comparison, and stays roughly flat as distance grows while exposure climbs.
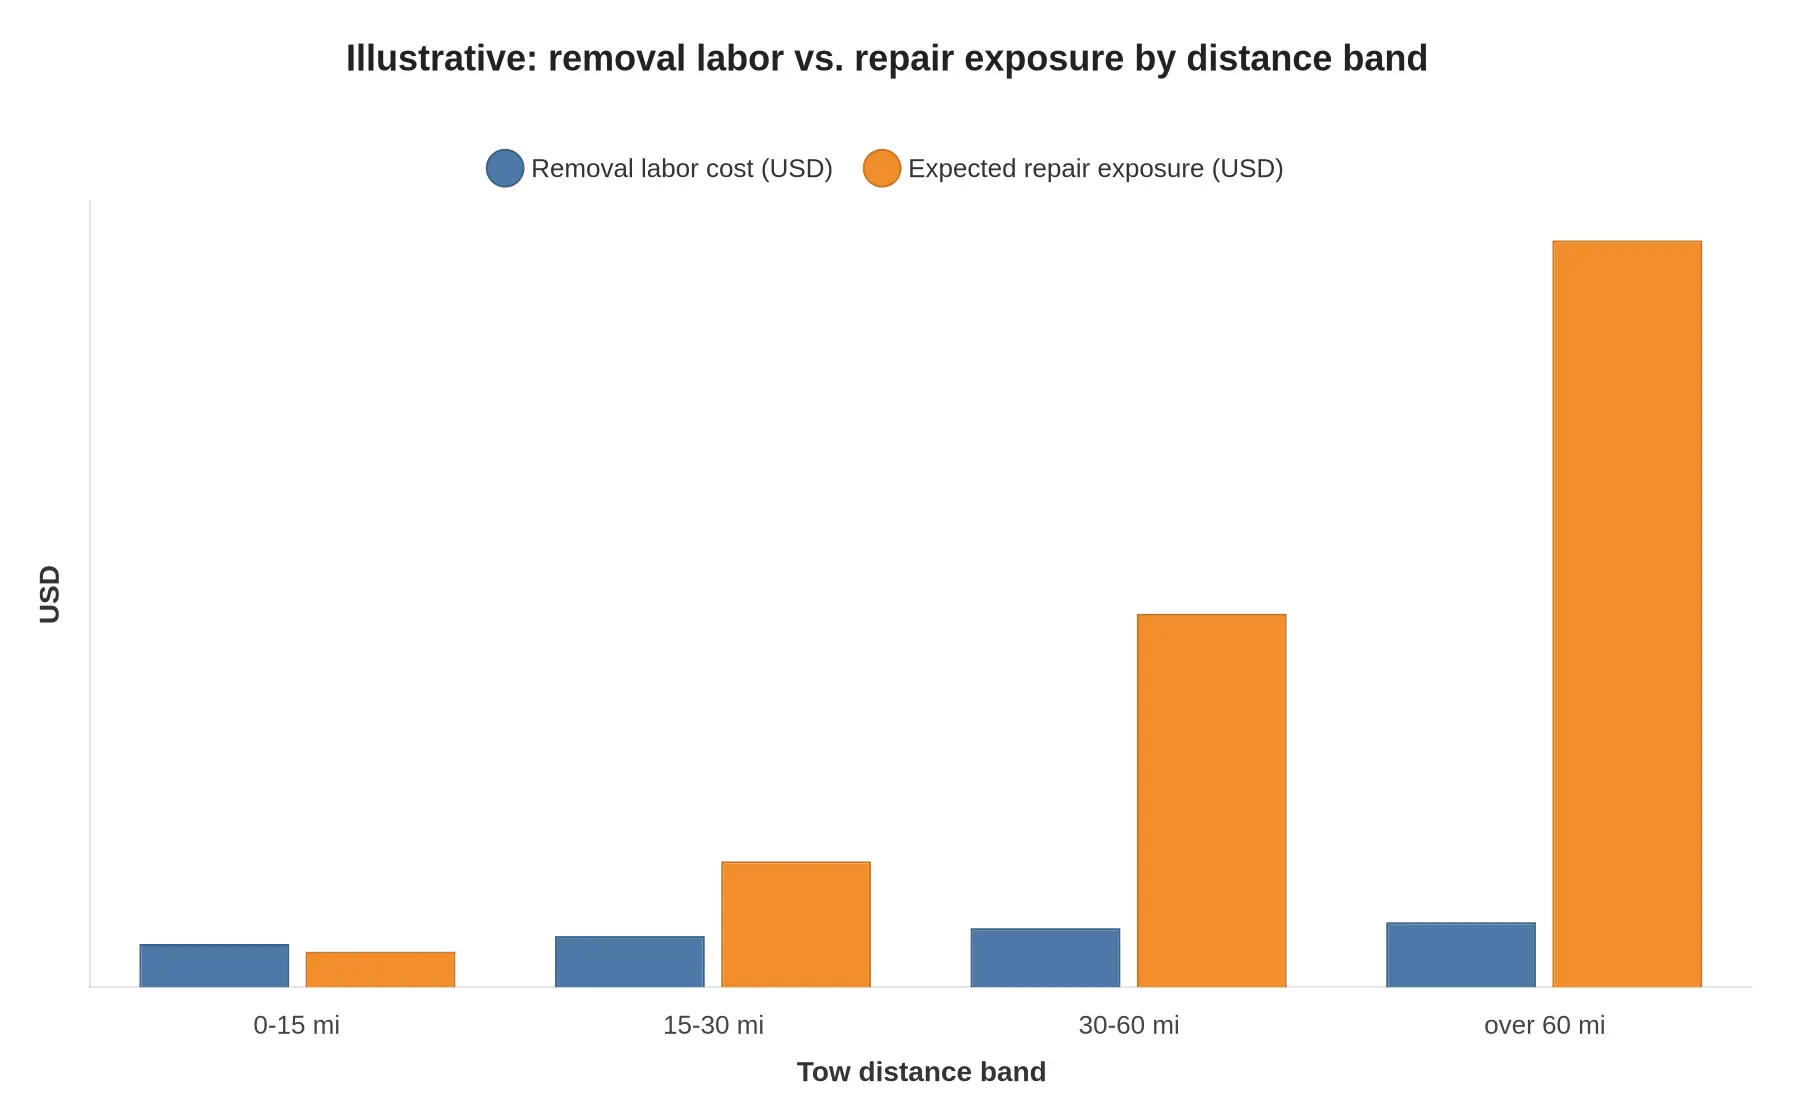
Substitute your own shop rate, parts quotes and downtime figure; the crossover point where removal becomes cheaper than exposure is the number your policy should cite. Fleet planners deciding whether to hold this capability or contract it can weigh dedicated semi tow capacity against their own downtime math.
Training operators to a single documented procedure
One procedure, one revision number, one laminated card in every truck. The card should state the sequence, torque values, fastener handling and the points where a second person verifies: wheels chocked and brake set, shaft match-marked before separation, bolts bagged and tagged, openings capped, shaft supported rather than left hanging on a joint. A lead technician should sign off the qualification and re-verify it annually, with a practical demonstration rather than a written quiz alone. A revision retires the old card the same day; otherwise two crews run two procedures and the ticket records stop being comparable.
Recording removal status on the tow ticket
The ticket is the handoff instrument across three parties, so the status block should be a required field, not a note line. Capture removed or left in place; which shaft and position, interaxle included; tag number matching the bagged fasteners; number of photos taken; operator initials and timestamp; receiving shop signature; and customer acknowledgment on their copy. A driveline that arrives with no recorded status invites a shop to install a shaft that was never removed, or to bill for a removal that never happened.
Frequently Asked Questions About Driveline Removal Before a 60 Mile Tow
These are the questions the shop phones get before a long recovery, answered the way we answer them on the bay floor.
1. Does the driveshaft have to be removed for every tow distance?
No. Any tow long enough to spin the output shaft at road speed with the engine off is a dry run for the gearbox, and removal is the standard procedure for a 60 mile tow. Yard moves measured in hundreds of feet, at walking pace, are the only case where the shaft stays bolted to the pinion yoke.
2. What happens to the transmission if the driveline is left connected?
The wheels back-drive the shaft, which turns the output shaft, the mainshaft and the rear bearing. On a manual Roadranger there is no pump at all: the countershafts, the only parts that throw oil up to the mainshaft, are not turning, so the shaft spins inside dry gears. On an automatic or an automated gearbox with an engine-driven pump, the pump is dead and line pressure is zero. Either way, a shaft spinning at highway speed with no oil supply wipes bushings and seizes the rear bearing. The table shows what turns and what stays dry.
| Component | Turns during tow (driveline connected) | Oil supply | Outcome |
|---|---|---|---|
| Transmission output shaft | Yes, at road speed | None – countershafts are not turning (manual); pump off (automatic) | Bearing and bushing seizure |
| Mainshaft gears | Yes, free-spinning on their bearings | Splash only, no throw from the countershaft | Dry bearing wear and gear scuffing |
| Differential ring and pinion | Yes | Ring gear splash | Heat build-up and oil varnish |
3. Is removing the rear axle shafts an acceptable substitute?
It works, with conditions. Pull both shafts on every drive axle and you break the torque path from the tires to the ring gear and stop the driveline; the hubs then freewheel on the spindle bearings. What you give up is a driveline park brake and positive lube at the wheel ends, and on some axles pulling the shafts drains oil out of the tube. On a through-drive tandem, leaving one axle connected keeps the power divider back-driven at close to double speed with nothing slinging oil at it. When the driveshaft can be reached, it is the cleaner disconnect: it takes the whole gear train out of motion and leaves the carrier in its oil bath.
4. Does idling the engine during the tow provide lubrication?
Some, not enough, and not where it counts. An idling manual does turn the input shaft and countershafts, so oil gets thrown around at idle speed, but the output shaft and rear bearing are still turning at road speed and idle throw is weak. The differential gets nothing from it. Idling also means a running engine unattended on a rolling load for the length of the tow, so it is not a substitute for disconnecting.
5. How do you confirm the driveline is fully disconnected?
Turn the slip yoke by hand on the removed shaft: it must rotate freely while the transmission output flange stays still. Then verify both ends – front flange bolts out and the shaft slung to the frame with a rated strap, rear U-joint clear of the pinion yoke with no residual contact. On a tandem, confirm the interaxle shaft so no torque path remains.
6. Does the differential need an oil change after a long tow?
Not by default, but drain and refill if the differential ran while spinning, which is the case when a shaft is left connected. Pull a sample after a 60 mile tow and check for scorch or glitter; if the cover is hot to the touch or the oil smells burnt, drain, refill to the fill plug and read the magnet. Differential oil fails from heat and shear, not from mileage alone.
7. What documentation should the operator record?
Log the removal time, the technician name and the exact storage location of the shaft and its hardware. Add the odometer, ambient and housing temperatures at hookup and drop-off, a photo of both separated flanges, and the lube level at the transmission and differential fill plugs. That record is what proves your procedure when a bearing fails two hundred miles down the road.
8. How often should you stop and check heat during the tow?
Take infrared readings at the first 20 miles and again at 40, aimed at the differential cover and the hub caps. A cover reading above 200°F means stop, cool and inspect the lube level before rolling another mile. Heat checks are the cheapest early warning you get on a 60 mile tow.
The Operating Rule: Disconnect Before You Drag
The premise is simple and unforgiving: any component that rotates without a lubrication supply accumulates damage in proportion to the distance it travels and the speed at which it turns. A mainshaft, an output bearing or a gearset that would normally be bathed in oil sits dry the moment the input stops feeding the circuit, and every mile of road speed meters out wear it cannot recover from. Over sixty miles the arithmetic stops being theoretical.
Everything above comes down to four actions:
- Decide the removal method. Match the approach to the actual shaft and yoke configuration on the truck in front of you – which section comes out, how the remaining assembly is supported, and what stays connected so the unit rolls without dragging load through a dry gearcase.
- Execute the procedure. Pull the shaft cleanly, secure caps and yokes so nothing walks loose or loses its needle bearings, and leave suspension geometry and brake plumbing untouched.
- Verify before rolling. Confirm the disconnected portion cannot spin, no dry bearing is carrying load, and the rolling gear turns freely by hand.
- Inspect after the tow. Check for heat at the housing, seal weeping, and any sign that something rotated that should have stayed still.
That sequence separates a professional operation from a hook-and-go, and it is the cheapest insurance on a long tow: a few minutes of shop time instead of a gearbox.
Standing rule: if the engine cannot supply oil to a rotating component, disconnect it before the wheels turn. The only tow short enough to skip it is one where the wheels never reach road speed.